
Remplacement de l'écran de l'iPad Pro 12,9"

Introduction
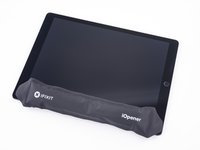
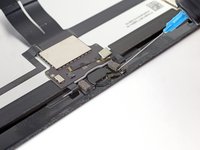
Passez à l'étape 1Suivez les étapes de ce tutoriel pour remplacer l'écran d'un iPad Pro 12,9" ou accéder à d'autres composants internes et les entretenir.
Notez que le bouton home installé dans votre écran d'origine est couplé à la carte mère de l'iPad et devra être démonté et transféré sur le nouvel écran pour garder la fonction Touch ID.
Avant de commencer, vérifiez que votre pièce de rechange comporte une carte fille derrière. Si c'est le cas, ce tutoriel est pour vous. Sinon, vous devrez transférer la carte de l'ancien écran sur le nouveau. Le transfert de la carte fille sur l'unité de remplacement nécessitera un équipement spécialisé de microsoudure et nous recommandons aux utilisateurs inexpérimentés de se procurer une autre pièce plutôt que de tenter la procédure.
Ce tutoriel est en partie illustré avec des photos prises sur un modèle Wi-Fi. Il est donc possible que les composants internes diffèrent légèrement de ceux du modèle LTE. La procédure reste la même pour les deux modèles, sauf indication contraire.
La procédure d'ouverture de cet iPad Pro est illustrée à l'aide d'une spatule (spudger). Si vous n'en avez pas, vous pouvez utiliser un médiator à la place – le processus est le même.
Ce dont vous avez besoin
Kit de réparation
Ce kit contient toutes les pièces et tous les outils nécessaires à la réalisation de ce tutoriel.

Pièces


Outils


Afficher plus…
-
-
Éteignez complètement l'iPad avant de commencer. (Ne pas mettre seulement en veille).
-
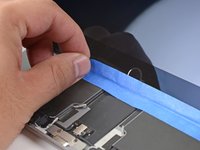
Placez des morceaux de ruban transparent en les faisant se chevaucher. Recouvrez complètement l'écran.
-
Faites de votre mieux pour suivre les prochaines étapes telles que décrites. Toutefois, le verre brisé risque tout de même de continuer à se fissurer avec les étapes subséquentes. Il est fort possible que vous ayez à utiliser un outil-levier métallique pour retirer les morceaux de verre restants.
-
-
-
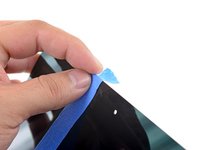
En procédant à l'incision dans l'adhésif, prenez les choses suivantes en compte :
-
Le haut de l'appareil possède une large bande d'adhésif. Vous devrez découper à une profondeur d'environ 1,2 cm pour le détacher.
-
Sur les côtés de l'iPad, ne dépassez pas 2 mm de profondeur avec votre outil ou vous risquez d'endommager le panneau d'affichage.
-
Le bas de l'appareil possède aussi des bandes adhésives larges, mais aussi de des nappes fragiles dans chaque coin. Ne pratiquez pas d'incisions plus profondes que 6 mm autour des coins inférieurs.
I have an A1652 iPad pro 12.9” that was originally my wife’s. The battery doesn’t hold a charge very long in use so I read through this guide and ordered the kit and battery. This iPad has a gold colored case that appears to wrap over the edges of the screen. As a result I could not find any place to slice through the adhesive. Model number brought up on the “about” screen is ML3P2LL/A and serial is DLXR3M7LGMW5. Is this possibly a transition model? Any ideas?
Hello! Based on the model number, it looks like you have the 1st generation cellular version of the iPad Pro 12.9". This guide should work for you. The tolerances on the iPad are very tight—you're looking for the seam between the black bezel and the gold case. You'll need a lot of heat in order to loosen the bezel.
-
-
-
Chauffez un iOpener et déposez-le sur le côté gauche de l'iPad pour ramollir l'adhésif retenant l'écran en place.
-
Attendez à peu près deux minutes pour permettre à l'adhésif de ramollir avant d'aller de l'avant avec l'étape suivante. Le côté devrait être légèrement trop chaud au toucher.
Oven works fine: preheat to ~225 then turn off, protect back with towel and warm for 10-15 minutes. Basically the same as a car interior in summer, this skips about a dozen steps. Used mini plastic pry tools and a few picks/cards, no need for suction or iopener: yet another reason microwaves should be relegated to diners to destroy perfectly good food. Two issues from my surgery: damaged small section of screen border by carding too far inside the device while effortlessly slicing through adhesive, and one of the smart connector pins was revived from bent pin purgatory. Apple’s planned obsolescence genius truly shines through the multipin snap connectors. I detached the screen cable before disabling battery, YMMV; remainder of procedure was done to spec with disabled battery on reinstall. Screw monster only ate about 2, even after breaking an elbow sweat with 70% iso the residual adhesive should outlast the ios nerf that will bring this ipad to the grave. Much easier than first impression with oven.
-
-
-
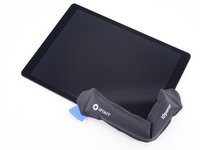
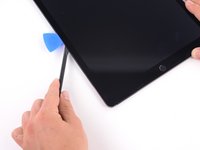
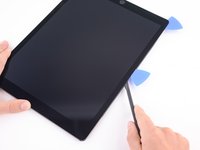
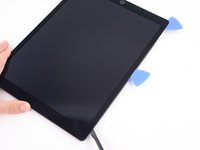
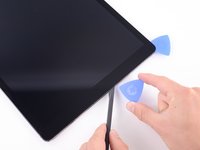
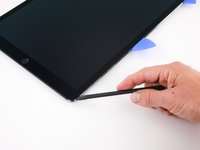
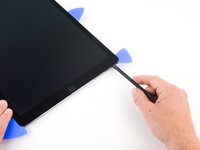
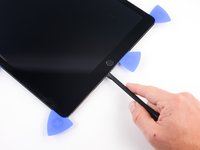
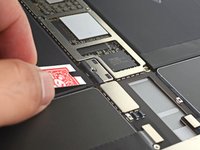
Installez une ventouse sur le côté gauche de l'écran de l'iPad, juste à côté du port Smart Connector (pour les accessoires).
-
-
-
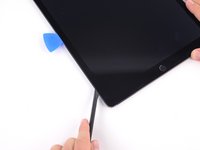
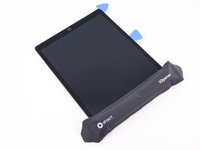
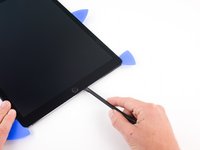
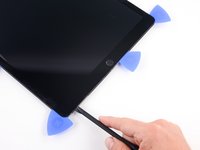
Placez un iOpener chaud le long du coin inférieur gauche de l'iPad, du médiator au bouton home.
-
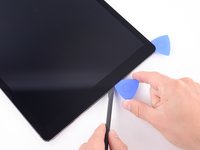
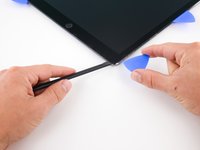
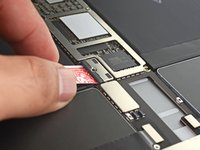
Après avoir laissé ramollir l'adhésif, insérez un médiator ou une spatule hallebarde dans l'espace à côté du Smart Connector.
-
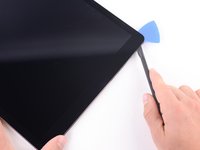
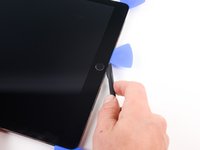
Utilisez un médiator ou une spatule hallebarde pour découper l'adhésif le long du côté inférieur gauche de l'iPad. Si le découpage devient difficile, réchauffez le bord et réessayez.
Well, this is the scariest part so hold my beer. I tried something similar to the “iOpener” which is a gel filled heat/cold pack I could microwave. That was good to start warming, but I was too impatient to get the first pick under, so I got out my heat gun. Mine is a 1200 watt model and I used it on low, the tip about 3 fingers away from the glass, sweeping it over 8” sections about 10 times taking about 3 seconds per pass. It worked ok and I now have 10 picks pried under all edges. Took about 35 minutes to this point. Only difficulty here is bracing the iPad while sliding the picks under the glass - need to be careful to not knock out the picks you already have inserted.
One note I might offer is that it’s not entirely clear from your pics which is the top/bottom/left/right side because it’s hard to see the button on the screen in your pics. Another is to mark your 2mm pick depth with whiteout or something similar.
-
-
-
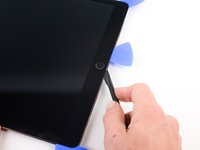
Placez un iOpener chaud le long du coin supérieur gauche de l'iPad, du médiator à la caméra frontale. Attendez une minute pour laisser l'adhésif se ramollir.
-
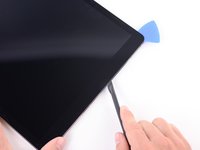
Utilisez un médiator pour découper l'adhésif le long du côté supérieur gauche de l'iPad. Si le découpage devient difficile, réchauffez le bord et réessayez.
-
-
-
Réchauffez votre iOpener et posez-le sur le bord supérieur de l'appareil. Attendez quelques minutes que l'adhésif se ramollisse.
-
Utilisez un médiator pour découper le bord supérieur de l'iPad, en vous arrêtant avant d'atteindre la caméra frontale.
-
Si le découpage devient dur, réchauffez le bord et réessayez.
-
-
-
Réchauffez votre iOpener et posez-le sur le bord supérieur de l'appareil. Attendez quelques minutes que l'adhésif se ramollisse.
-
Insérez un médiator ou une spatule hallebarde juste après la caméra frontale.
-
Utilisez le médiator pour découper l'adhésif dans le coin supérieur droit.
-
Si le découpage devient dur, réchauffez le bord et réessayez.
-
-
-
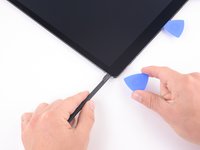
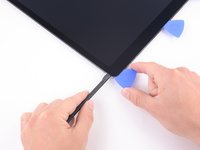
Faites ramollir l'adhésif en chauffant le bord droit de l'iPad à l'aide d'un iOpener.
-
Utilisez un médiator ou une spatule hallebarde pour trancher l'adhésif le long du bord droit de l'iPad, jusqu'à ce que vous atteigniez le coin inférieur droit.
-
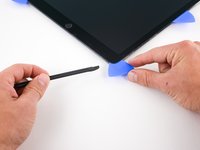
Laissez un médiator au milieu du bord droit pour empêcher l'adhésif de réadhérer.
-
-
-
-
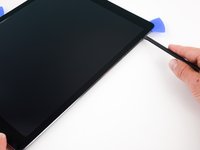
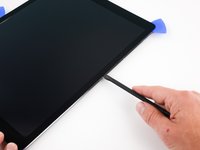
Utilisez un iOpener pour chauffer le bord inférieur de l'iPad.
-
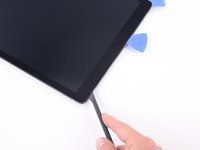
Insérez un médiator ou une spatule hallebarde (habderd spudger) d'environ 0,6 cm dans le coin inférieur droit de l'iPad.
-
Glissez le médiator le long du bord inférieur de l'iPad, en vous arrêtant à peu près à 1,2 cm du bouton home.
-
-
-
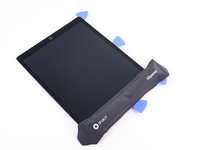
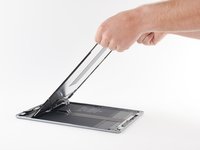
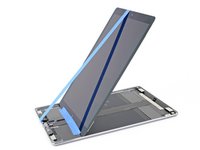
Soulevez le bord supérieur de l'écran et faites glisser l'ensemble de l'écran vers la caméra frontale pour accéder aux composants internes de l'iPad.
-
Utilisez du ruban de masquage pour coller la partie basse de l'écran au châssis afin d'empêcher l'écran de glisser.
For me, disaster struck at this step. I was being careful but somehow lifted the wrong end and snapped the ribbon cable.
😟😟😟 Be careful It would have been helpful to label the screen's top and bottom edges with a marker and tape at the beginning of the repair process. For that matter, label right and left edges as well. Then change all dialog to reference top, bottom, left, or right. I think it would make it easier to follow the instructions
-
-
-
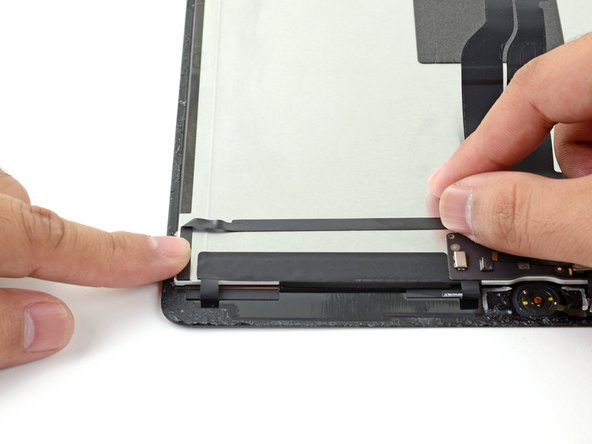
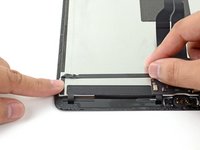
Attachez une longue bande de ruban de masquage en haut de l'écran. Pliez le ruban par-dessus le bord de l'écran et vérifiez que le ruban tient bien.
-
Attachez l'autre bout du ruban au bord inférieur du cadre de l'iPad pour maintenir l'iPad oblique. Assurez-vous que le ruban tienne bien aussi sur le châssis.
Just make sure you use plenty of tape on the backside of the screen and on the underside of the iPad and the tape won't slip.
-
-
-
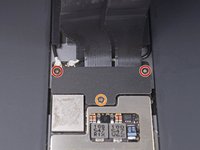
Avec un tournevis cruciforme, retirez les neuf vis qui maintiennent le blindage électromagnétique (EMI) de la carte mère.
-
Huit vis de 1,2 mm
-
Une vis de 2,4 mm
-
-
-
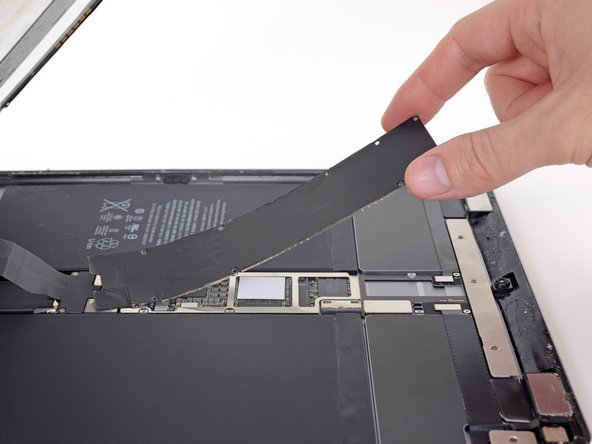
Soulevez le blindage EMI de la carte mère en partant du bord qui se trouve près du haut de l'iPad.
-
Déroulez et retirez le blindage EMI de la carte mère.
-
Retirez le blindage EMI de la carte mère.
In the iPad 4G version, this is where the cellular radio sits. You might see some different chips underneath the EM shield, and a little adhesive gasket. When I pulled my EM shield off I tried not to disturb that adhesive, and put it back when I was done.
-
-
-
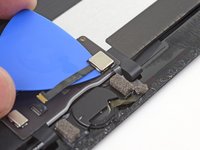
Fabriquez un dispositif pour isoler la batterie à l'aide d'une carte à jouer et faites-le glisser sous le connecteur de la carte mère pour déconnecter la batterie.
-
Laissez l'outil en place pour empêcher les fils de connexion de faire contact jusqu'à la fin de votre réparation.
-
-
-
Avec un tournevis cruciforme, retirez les trois vis qui maintiennent le cache des nappes de l'écran.
-
Deux vis de 2,4 mm
-
Une vis de 1,2 mm
-
Retirez le cache des nappes de l'écran.
-
-
-
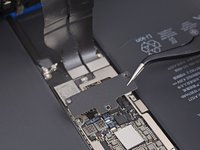
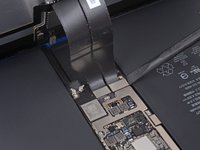
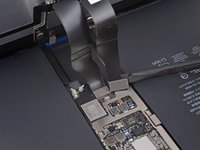
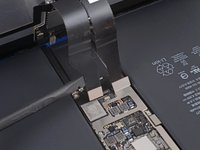
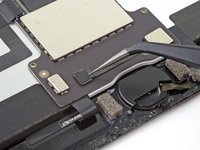
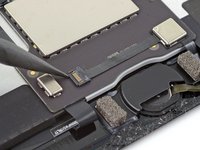
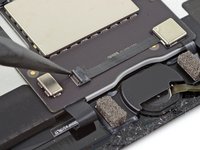
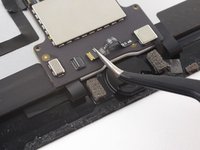
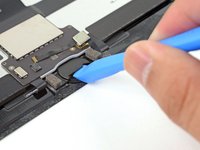
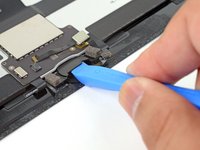
Avec le bout plat d'une spatule, soulevez et détachez les nappes de l'écran et de la vitre tactile de leurs prises sur la carte mère.
Would it help to draw a sharpie line between the two parts of the connector, so these can be alingned when refitting?
-
-
-
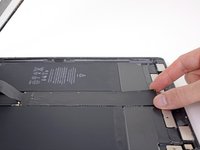
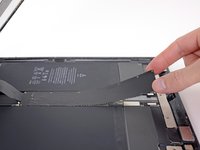
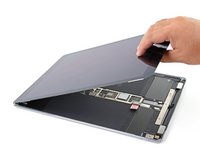
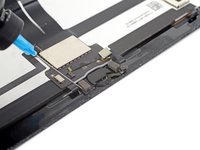
Retirez l'écran.
-
Si votre écran n'est pas fourni avec de l'adhésif pré-posé, allez faire un tour du côté de notre tutoriel pour poser des bandes adhésives pour écran pour installer de nouvelles bandes adhésives lors du remontage de votre iPad.
Phew! One hour 45, took my time, maybe cut that in half if I did it again and pray I don’t have to. Working sideways, the little screws were usually caught by the battery on the bottom edge. Need a shorter Phillips than in the iFixit kit. And looks like I don’t need the pre-cut adhesives I bought as they were on the replacement screen - hopefully I can get a refund.
Good time for a coffee break before cleaning off the old adhesive. Quite a relief to get the screen off & thanks much to you guys for getting me this far.
Es wäre sehr schön, wenn hier noch jemand beschreiben könnte, wie man "unfallfrei" die Klebereste vom Display rundherum entfernt. Ich habe das in meinem Falle ganz vorsichtig mit Isopropanol (hochrein) getan. Die Klebereste gingen damit gut ab - trotzdem ist das eine sehr aufwendige Arbeit, bis man alles sauber hat. Zudem kann man noch so vorsichtig sein, durch die angebrachte Displayunit auf der Rückseite der Displayscheibe und die dadurch entstehende Kapillarwirkung zieht sich immer Isopropanol zwischen Display und Displayunit, was danach zu hellen Flecken führt. Ich hoffe, die verschwinden wieder, wenn das Iso abgetrocknet / ausgetrocknet ist.
Vielleicht hat jemand eine gute Idee, wie man diese Klebereste entfernt, ohne dass das Beschriebene passiert.
Markus,
I just wouldn't use any isopropyl alcohol to remove the residue. We're going to immediately apply more adhesive right after we remove the old adhesive, so if there's a little bit of sticky residue remaining, that's not a problem for us. I would just scrape as best as I could with a spudger, make sure there's no adhesive on the internals, and call it a day.
-
-
-
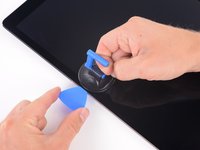
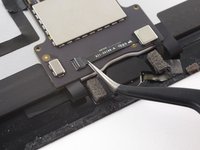
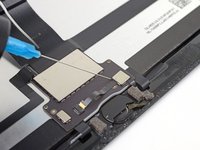
Avec une pincette, retirez la bande adhésive qui recouvre le connecteur ZIF au-dessus du bouton home.
-
-
-
Utilisez un iOpener, un pistolet à air chaud ou un sèche-cheveux pour ramollir l'adhésif sous la nappe avant de la soulever.
-
Vous pouvez également appliquer quelques gouttes d'alcool isopropylique sur la nappe et attendre une minute pour laisser l'adhésif se ramollir.
I used a heat gun on low air, set to 150°C, and very very gentle pressure with the tweezers, and it came out very easily and neatly.
-
-
-
Appliquez quelques gouttes d'alcool isopropylique sur la base du cache du bouton home.
-
Vous pouvez également utiliser un iOpener chauffé pour ramollir l'adhésif.
-
-
-
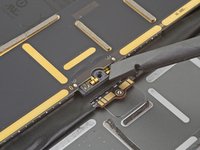
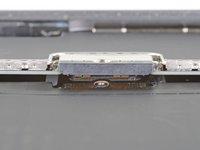
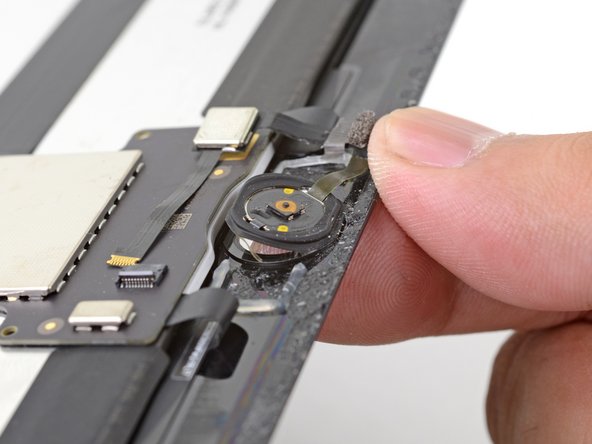
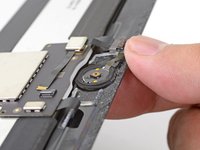
Retirez le support du bouton home.
-
Grattez autant que possible les résidus d'adhésif, puis nettoyez le reste avec de l'acétone ou de l'alcool isopropylique à haute concentration (> 90 %).
-
Fixez le support avec de la colle chaude, de la superglue ou du ruban adhésif double-face haute résistance. Assurez-vous que le cache est correctement aligné avant de laisser durcir votre colle, sans quoi le bouton home ne cliquera pas lorsqu'on appuiera dessus.
Would be really nice if the adhesive strip kit for the screen included the adhesive bits needed to secure the existing home button to the new screen (or a new home button to an existing screen).
One more thing about the bracket: you really need a strong adhesive when you put it back, so that pushing the button doesn’t dislodge it. If it doesn’t hold the button firmly, you can push the button out of its socket during normal use. Getting the bracket in and aligning it without accidentally sticking it in the wrong place or (much worse) sticking it to the fragile ribbon cable takes some very careful work.
This is an excellent guide, but I’d like to see maybe the first two steps of reassembly, showing how to do this correctly.
When replacing the bracket, a very slight difference in the replacement part caused the bracket to make the home button click all the time. The little white washer between the home button and the back of the glass was about 0.3 mm thicker than the original, and i had already superglued those parts together.
Fortunately, the playing card included in the kit is about 0.3 mm thick. I cut 2 small rectangles and superglued them to the feet of the bracket, so it would stand away from the home button. Then superglued the bracket on, and now it clicks perfectly. Hopefully I don't have any issues with the playing card delaminating as the home button wears, because I definitely don't know if i could get this ipad apart again (the first time was easier because the screen was already shattered).
-
-
-
Poussez doucement le bouton home depuis l'extérieur de l'écran vers l'intérieur avec le bout d'un doigt.
-
-
-
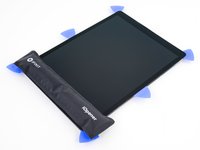
Retirez tout l'adhésif d'emballage.
-
Retirez les revêtements adhésifs des nappes et appuyez sur les nappes pour les mettre en place sur l'écran.
-
Pliez et connectez la nappe dans le coin inférieur gauche de l'écran.
-
Ne décollez pas le périmètre adhésif avant d'avoir testé votre réparation et d'être prêt à sceller votre iPad.
manca la parte di montaggio del nuovo schermo ?
Ciao Roberto,
Per montare il nuovo schermo, puoi seguire le istruzioni dello smontaggio in ordine inverso. I punti con la puntina da disegno si riferiscono in particolare al rimontaggio.
Buona riparazione!
-


Comparez votre nouvelle pièce de rechange à la pièce d'origine. Vous devrez peut-être transférer les composants restants ou retirer les supports adhésifs de la nouvelle pièce avant l'installation.
Pour réassembler votre appareil, suivez ces instructions dans l'ordre inverse.
Apportez vos déchets électroniques à un recycleur approprié.
La réparation n'a pas fonctionné comme prévu ? Utilisez notre Forum pour obtenir de l'aide au diagnostic.
Annulation : je n'ai pas terminé ce tutoriel.
90 autres ont terminé cette réparation.
Merci à ces traducteurs :
100%

Ces traducteurs nous aident réparer le monde ! Vous voulez contribuer ?
Commencez à traduire ›

24 commentaires
Hello there OK so I have 2 screens with 2 different connectors one L shaped (which is on the new screen) and the old cracked screen has a rectangular type? I’m not sure rather it’s a 1gen/2nd gen type of problem? I’m about to grab my hot air gun to completely disassemble the cracked screen, as maybe I’m missing something? Any assistance is welcome… well actually please help me with this before I get a headache since this has totally frustrated me and i’ve had this sitting for nearly 2 1/2 months now but it’s about that time that I readdress this in attempt to fix it.
Hi, does your replacement screen have the home button assembly included? Otherwise there's need of soldering the assembly to it before it can be installed.
Dreetn -
hi
does anyone knows why there is a foam adhesive in thr back of the screen ? do i need to put back when i replaxe screen ?
thanks
I suppose the foam adhesive is similar to the one on the back of the 6s screens. I guess it has more of a heat dissipation function or is meant to absorb any pointy pressure points from inside that may develop (loose screw, sand, dirt...)
Dreetn -
hi
hope someone can help . i tested couple of screens before fitting them in they were working but once tech close it there no touch or black lcd (backlight on but no image )
NB : they disconnect battery before connecting Screen
If you don't have this problem while the assembly is still loose, my best guess is that you have an unwanted contact somewhere, causing a short circuit or malfunction. Perhaps in the bending of the flex?
Dreetn -
Removing the screen takes a great degree of patience. You apply heat, and pull on the suction cup, and for a long time nothing seems to happen. Do not try to replace time with force at this point keep heating and pulling on various areas, you will get separation. It took 5 or 6 heating/pulling cycles to start to see results. Then you can work your way around.
MAKE SURE YOU DO NOT INSERT ANY CARDS/PICKS/SPUDGERS MORE THAN 1/4 inch tops!! YOU WILL DAMAGE THE SCREEN. Just replaced the battery in my iPad Pro 12.9 (A1652). Unfortunately I did not read this until completed. I now have several areas on my $1000 iPad where the white screen has orange burn looking marks around the edges. Looks like it was a $200 oops. Live and Learn. I’m now a member and will utilize this website for future endeavors…
You know any workshop who does a repair for my three iPad Pro 12.9 front glasses with the digitizer,
Sometimes the process is called OCA refurbishment oder LCD refurbishment.
NOT the display-unit as a whole. I have two models from 2015 and one from 2017. The model numbers are a 1584 and a 1670.
In Germany there are a few companies who are able to do it, but not affordable. The prices are nearly as high as a complete swap of the display unit.
Just wondering, I work in a repair shop, and am replacing the front panel entirely but unfortunately screwed up soldering the daughterboard. Is this a part they MUST be transferred or am I safe to just replace it?
Hello.
Is it possible to change only the “Glas” and not the Display? My display works fine but the Protecting Glas is broken.
Hi, that’s possible for very, very experienced technicians. Not only do you need to heat up the screen quite a lot to soften up the LOCA glue, but furthermore you need to cut it with a cutting wire while making sure not to damage the LCD underneath. I also fear the iPad pro will probably require some micro-soldering to be able to (dis)connect the glass from all the rest (but perhaps I’m confusing things with the first screen modules in mind that came out but still needed some micro-soldering to finish them of at that time). In short, if you haven’t separated touchscreens/glass plates several times before … don’t even think about it. The above is only half the trouble to go through as the new touchscreen/glass needs to be attached to the LCD again with new LOCA glue afterwards. Again a job which requires a lot of expertise.
Dreetn -
I used this guide to replace a screen for my iPad Pro. The device powers on but now gets stuck in a boot loop. I took it to a local phone repair shop and they said they don’t do repairs on iPad Pros because they always get stuck in boot loops. I wish there was a warning on this guide telling people this so they don’t go to all the effort and spend money on a new screen just to get their iPad stuck in a boot loop.
Brandon, I don’t know of any specific ‘sensitivity’ that iPad Pro’s have towards repairing that would result in bootloops.
I think it is more likely that either
- The repair shop isn’t keen on repairing your device because parts are expensive and/or difficult to find (for instance motherboard parts). They just tell you a believable story to avoid having to say ‘Too risky’ or ‘Not worth our effort/time’.
- Something got damaged during the repair.
Another possibility, which you can easily put aside yourself, is software damage. Try a full restore (without data retention) with tools such as 3uTools. It’s free software. I advise using the iTunes restore method. You can first try a restore with ‘retain user’s data’ but success ratio is minimal there. Best is to go for a clean flash/restore.
Good luck!
Dreetn -
No matter how many times I have tried to apply the iOpener, or to use a dryer for 10 mins (iPad was super hot), I’m simply unable to lift the screen with the suction cup, even for a micron. Anything I could have missed ?
Hi Laurent, it sounds like you’re on the right track—continue gradually applying more heat until the adhesive softens a little. Unfortunately these screens are super hard to remove. Just be careful about applying too much heat at once in a small area as that could damage the screen.
While removing the screen I accidentally pulled the soldering from the daughterboard to the display cable. is their a way to fix this or is it an issue?
This was an awesome guide! It was really fun, but a lot of really careful work!! How could anybody do this repair and charge a reasonable rate for the labor? It took me soooo long.
Bonjour, je n'arrive pas à connecter les deux nattes pour remettre l'écran. Sur l'écran original, le tout se solidarise avec un click mais la impossible de connecter les deux. Avez-vous une solution ?
MErci,
Bonjour @alexandrebesse, avez-vous vérifié que votre pièce est bien compatible avec votre iPad ? Si c'est le cas, veuillez contacter le SAV, au support@ifixit.com (pour la boutique américaine) ou au eustore@ifixit.com (pour la boutique européenne et française) en cas d'achat chez iFixit. Bon diagnostic ! Claire
DO NOT BELIEVE THE YELLOW MARKING ON THE LOWER EDGE!! There are 5 cables there that you can easily cut. Should have been indicated better on the map. Try not to slide the pick on that area and just poke gently inside.