Il est possible que cette traduction ne reflète pas les dernières mises à jour du tutoriel source. Aidez à mettre à jour la traduction ou bien consultez le tutoriel source.
Introduction
Ce tutoriel de réparation provient de l'équipe iFixit et n'a pas été soumis à l'approbation de Google. Pour en savoir plus sur nos tutoriels de réparation, c'est par ici.
Utilisez ce tutoriel pour retirer ou changer la batterie usée d'un Google Pixel 4. Si votre batterie est gonflée, prenez les précautions nécessaires.
Pour votre sécurité, déchargez votre batterie en dessous de 25 % avant de démonter votre téléphone. Cela réduit le risque d'incendie dangereux si la batterie est accidentellement endommagée pendant la réparation.
Remarque : certaines photos de ce tutoriel montrent le plateau de la carte SIM éjecté du téléphone. Vous n'avez pas besoin d'éjecter le plateau de la carte SIM pour cette procédure.
***Attention :** Google avertit que le démontage de l'ensemble laser avant pourrait entraîner une exposition dangereuse à des émissions laser infrarouges invisibles. Lisez leurs avertissements de sécurité ici.
Ce dont vous avez besoin
-
-
Préparez un iOpener et appliquez-le sur le bord inférieur de la vitre arrière pendant une minute.
-
-
-
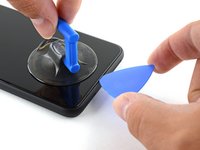
Appliquez une ventouse sur le bord chauffé de la vitre arrière en appuyant dessus pour créer une aspiration, aussi près que possible du bord.
-
-
-
Tirez sur la ventouse avec une force constante pour créer un espace entre la vitre arrière et le châssis.
-
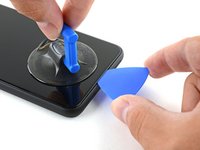
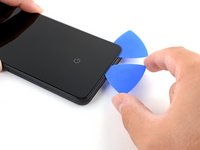
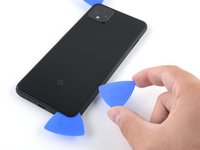
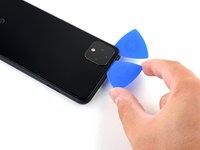
Insérez la pointe d'un médiator dans l'espace.
-
-
-
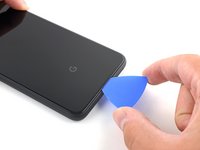
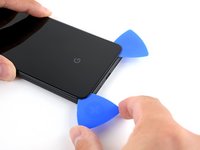
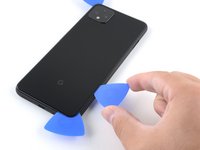
Faites glisser le médiator le long du bord inférieur, vers le coin gauche, pour couper l'adhésif.
-
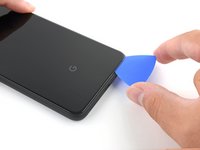
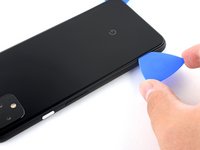
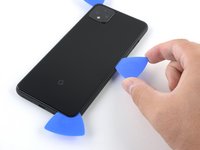
Laissez le médiator inséré et faites-le glisser depuis le coin inférieur gauche vers le coin inférieur droit, afin de couper complètement l'adhésif du côté inférieur.
-
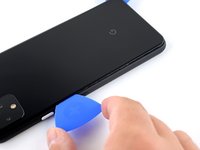
Laissez le médiator inséré dans le coin inférieur droit pour empêcher l'adhésif de recoller.
-
-
-
Préparez un iOpener et appliquez-le sur le bord gauche du téléphone pendant une minute.
-
-
-
Préparez un iOpener et appliquez-le sur le bord droit du téléphone pendant une minute.
-
-
-
-
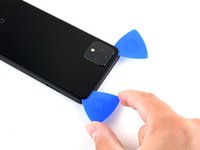
Les deux premiers médiators étant toujours en place, insérez un troisième médiator dans la partie inférieure du côté droit.
-
Faites glisser ce troisième médiator vers le haut du téléphone, en coupant l'adhésif du côté droit.
-
Arrêtez-vous lorsque vous atteignez le coin supérieur droit et laissez le médiator inséré.
-
-
-
Faites glisser le troisième médiator autour du coin supérieur droit et le long du côté supérieur du téléphone, en coupant ainsi la dernière bande d'adhésif.
-
-
-
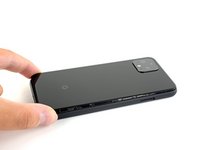
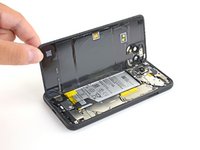
Une fois que vous avez tranché sur tout le périmètre du téléphone, soulevez délicatement le bord droit de la coque arrière, en l'ouvrant comme un livre.
-
N'essayez pas encore de retirer complètement la vitre, car elle est toujours connectée au téléphone.
-
-
-
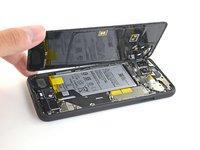
Continuez à ouvrir la vitre arrière jusqu'à ce que vous puissiez la poser sur le bord gauche du téléphone, en veillant à ne pas exercer de pression sur la nappe attachée.
At this point I suggest taking a photo of what you're seeing in there. This way you can make sure you put it all back the way it was when you're done.
-
-
Outil utilisé dans cette étape :Magnetic Project Mat$19.95
-
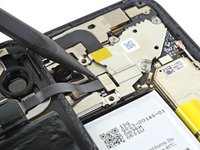
Retirez les cinq vis Torx T3 fixant le cache du connecteur de la batterie :
-
Quatre vis de 4,0 mm
-
Une vis de 2,1 mm
Does anyone know where I can get a replacement T3 - 2.1mm screw (the one circled in orange)? I lost this screw during the battery replacement. Had it, dogs fought, had to get up to break it up, and couldn’t find it. I swore I put it on the mat, but I couldn’t find it when I got back to the table. :(
-
-
-
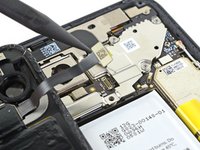
Utilisez un tournevis Torx T3 pour retirer les deux vis de 4 mm fixant le cache du connecteur de la vitre arrière.
-
-
-
Retirez la vitre arrière.
Why does the kit not come with the back panel adhesive?
It's not cheap to get the full kit, and it seems like it's such a small thing to include.
I ended up re-using the existing back panel adhesive and now a bit worried that it's not as strong and I will have issues with water or moisture getting into the device more easily.
-
-
-
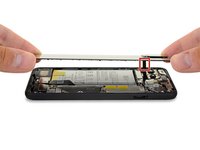
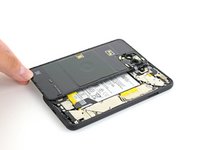
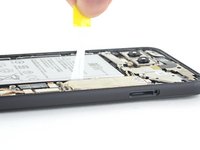
Tirez sur la languette jaune de la bande adhésive avec une force constante.
-
Continuez à tirer fermement sur la bande adhésive avec une force constante. Si vous utilisez un spatule, faites-la tourner de temps en temps pour garder la section exposée de la languette aussi courte que possible.
-
Continuez ce processus pour chacune des trois languettes, jusqu'à ce qu'elles soient toutes sorties ou cassées en deux.
These are basically like command adhesive strips. If you don't get them off by pulling the tab you can pry them up but it is not easy. This is three strips of strong adhesive.
I pulled the adhesive strips upwards and they just torn leaving most of the adhesive beneath the battery. Battery is impossible to remove now.
I too have experienced something like that. In this case I followed step 22 below to push the opening pick in and force it away from the adhesive. Some strength will be required. The key is to apply balanced force to prevent the battery from being deformed and damaged.
-
-
-
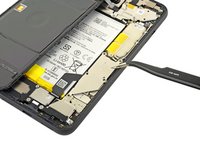
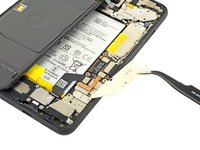
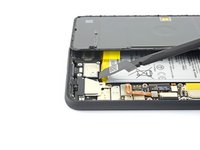
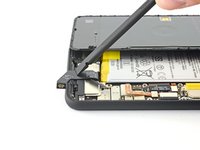
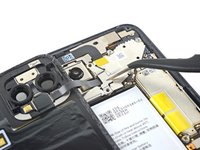
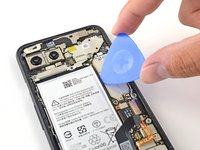
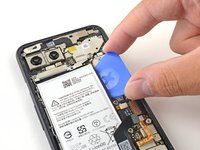
Si les languettes adhésives de la batterie se sont cassées lors du retrait, insérez un médiator sur le bord supérieur droit de la batterie, afin de couper l'adhésif en dessous.
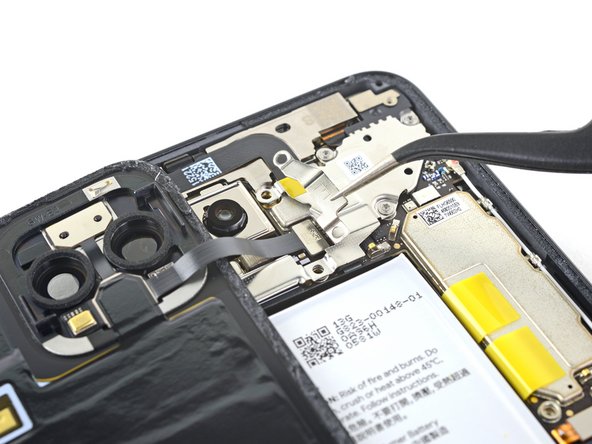
The grip sensor cable picture here is incorrect for my pixel 4; on mine it runs straight from the connector on the right to the left edge of the case, then makes a 90° turn downward to where it connects to the sensor. The result was that I tore the cable because I was using the picture as a guide. I've taken a picture of the alternative placement on mine and I'll send it to the iFixit people to update this guide.
At the bottom end of the battery there is a thin white antenna cable, somewhat hidden between battery and speaker / charging unit. It is also a bad idea to use a pick on the lower adhesive strip. In my case the cable glued to the rest of the strip and I damaged it when lifting the battery.
-
-
-
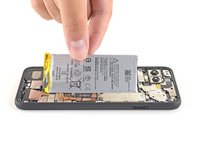
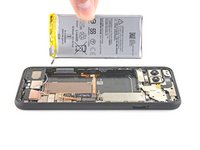
Soulevez la batterie et retirez-la du téléphone. Vous devrez peut-être décoller la batterie des languettes adhésives restantes.
-
Si vous utilisez des bandes adhésives étirables, appliquez-les sur la batterie. Sinon, appliquez du ruban adhésif double-face ou des bandes adhésives prédécoupées dans le compartiment de la batterie, en veillant à ne pas couvrir la nappe du port de charge. Décollez tous les films de protection de l'adhésif.
-
Reconnectez temporairement le connecteur de la batterie à sa prise sur la carte mère. Cela garantit que la batterie est positionnée correctement.
-
Mettez la batterie en place et appuyez fermement dessus.
-
Débranchez le connecteur de la batterie de sa prise sur la carte mère et reprenez le remontage.
There is a better guide for applying the back adhesive. Search out the guide for the pixel 4 back adhesive on this website. It sucks that they didn't include it here, and I messed it up by trying to decipher these generic instructions.
Thanks for this @joegaughran - saved me a problem. For others, the guide can be found here: How to Replace the Back Panel Adhesive on Your Google Pixel 4
phzdw -
-


Pour des performances optimales, calibrez votre batterie nouvellement installée après avoir terminé ce tutoriel.
Comparez votre nouvelle pièce de rechange à la pièce d'origine. Vous devrez peut-être transférer les composants restants ou retirer les supports adhésifs de la nouvelle pièce avant l'installation.
Pour remonter votre appareil, suivez ces instructions dans le sens inverse.
Amenez vos déchets électroniques à un recycleur certifié.
La réparation ne s'est pas déroulée comme prévu ? Essayez les diagnostics de base ou demandez de l'aide sur notre Forum.
Annulation : je n'ai pas terminé ce tutoriel.
61 autres ont terminé cette réparation.
Merci à ces traducteurs :
88%


Ces traducteurs nous aident réparer le monde ! Vous voulez contribuer ?
Commencez à traduire ›


28 commentaires
If you are gonna sell me your tool kit at least supply a *!&$!&$^ T3 Tork bit to complete the job.
Hi Nicholas,
The iFixit kit should definitely have a T3 bit. Please contact our customer support and we will get the issue resolved!
Hey Keith,
When putting the phone back together and reinstalling the back panel, we recommend removing the old adhesive and installing new adhesive. The Pixel 4’s back panel adhesive can be found here, and a guide on how to install it can be found here!
If you’d like to reuse your old adhesive, try removing any large uneven chunks, reheat the adhesive, and press the back panel back into place.
Does the kit include replacement battery adhesive strips? I don’t recall seeing it in mine.
Hey Nikki!
The kit should come with a pre-cut adhesive card. You can pull strips from the card to adhere your battery to the frame.
@arthurshi Thanks, I figured as much. However, I thought it would be nice if they included this instead of the pre-cut adhesive card. This way the battery can still be removed the Google factory way. [produit lié absent ou désactivé : IF356-191]
That’s a great idea! We got the battery strips recently and haven’t had a chance to incorporate them into the kit. We’ll definitely do that.
After putting in the new battery the phone doesn’t turn on. If I plug in a charger I get the splash screen and then the battery icon indicating the charge level (85%). What am I missing here?
For anyone who may find this later - my issue was the side button connector ribbon cable came loose in the process of removing the old battery. I had to remove the cover for that and then re-seat the connector. I put it all back together and it’s working great now.
Bryan P -
After replacing the battery and putting it back together, the WIFI is no longer working. It only works when the phone is on top of the WIFI router now.
I cleaned the contacts for the WIFI on the back cover, but still nothing. I reformed the contacts on the board and that didn’t help either.
Anyone else have WIFI issues after replacing the battery?
Great tutorial and I followed step by step successfully. But I did (and recommend to do) steps 17 - 20 first, and 13 - 16 afterwards. If you remove the back panel first, it is easier to unconnect the battery than vice versa.
I have successfully completed this repair guide twice. Thanks a lot for providing the guide!
One thing: One of the iFixit batteries had a charge level of 1%, so it was about to be completely discharged. If you have other rechargeable batteries in stock, you should charge them from time to time, otherwise they may get destroyed.
Very good guide and the fixit kit is awesome.
All went well and battery works like the first day!
I recently replaced the battery on my pixel 4 and it was a simple fix with this kit. However, my back panel is not remaining stuck down. Particularly the corner around the camera starts to separate when my phone gets hot. This was the first indication that my old battery was bulging, and I'm hoping that's not the case again so soon. (It's only been 3 days!).
It could also be that I didn't properly seal the back. I have been unable to find good instructions for using the supplied back panel adhesive. I had to basically make it up.
Did I need to heat it? Clamp it? How to properly close the back? Yesterday I tried applying the iOpener again, then clamping the back closed and putting the phone in the fridge for 5 min. Doesn't seem like it worked.
Any tips? I could buy another back panel adhesive ($8 cdn) but maybe I can still fix this?
This guide is great. After reading it, I'm confident enough to buy the parts to fix my phone myself!
I just changed the battery of my pixel 4 and it was the easiest phone repair I’ve ever done, all thanks to this guide and the kit available. Thanks!
Ugh! My camera has spots all over it now! I guess my battery is ok though.
It took me approximately 2 hours to complete this guide including the significant amount of time cleaning the previous adhesives off the phone. In my case I may not have needed to be so thorough but am happy with the results - resealing the back cover had zero issues.
A pretty reasonable repair for someone with steady hands. I am happy to see a significant performance increase from the replaced battery compared to the 4 y/o one.
Das Auseinandernehmen des Gerätes mit Hilfe des "Wärmekissens" und der Plektren war kein Problem, ebenso wie der Ausbau des Akkus. Das nervigste an der ganzen Reparatur war das Entfernen der Klebereste der Gehäusedichtung. Trotz der Zuhilfenahme von Q-Tips mit Klebstoff-Löser hat mich dieser Schritt ganze 2 Stunden gekostet!
Nach dem Einbau des Akkus dann für einen kurzen Moment Herzrasen, als das Gerät nach dem Einschalten mit einem roten Akku-Symbol sofort wieder ausging. WT...?? Dann Ladekabel angeschlossen und Erleichterung genossen: das Gerät begann bei 1% zu laden! Anscheinend wird der Akku im entladenen Zustand geliefert. Ich hoffe nur, er war nicht tiefentladen!
Beim Hantieren mit der neuen Gehäusedichtung sollte man vorsichtig und sehr behutsam vorgehen, um sie nicht verkehrt anzusetzen. Das war ein Moment, in dem ich mir mein altes S3 zurückwünschte: Rückwand ab, Akkus wechseln, Rückwand wieder anstecken, fertig! Kein Kleber, keine Schrauben. Früher war manches doch besser als heute...
English version:
Taking the device apart using the "heat pad" and picks was easy, as was removing the battery itself.
The most annoying part of the whole procedure was the removing of the adhesive residue from the housing seal. Despite using q-tips and glue remover, this step took me 2 hours!
After installing the new battery, there was a brief moment of palpitations when the device immediately switched off again with a red battery symbol on the screen. WT...?? Then I connected the charging cable and relief was felt: the device started charging at 1%! Apparently the battery is delivered in a discharged state. I just hope it wasn't deeply discharged!
When handling the new housing gasket, you should be careful not to put it on incorrectly. That was a moment when I was mourning for my old S3: removing the back panel, changing the battery, reconnecting the back panel, done! No glue, no screws!
Some things used to be better than today...
The fitting kit and the instructions were fantastic. First time stripping down a phone and after this it won’t be my last. The kit contains everything you need. Check all the boxes as I thought my triangular openers were missing but I found them at the bottom of the heater pack. To remove the old seal from around the edge of the phone use the heater pad to warm the old seal first then use a sharp blade to remove it with ease. Thank you.
it helps to have a partner when installing the first pick at the bottom. I had to heat my bottom edge 4 times and then hold the front while pulling on the suction cup. My partner was able to get the first pick in and then I could proceed with the rest of the instructions. I agree with the person above that getting the old battery out was a pain. My bottom tab broke right away but my dual side tabs stretched without breaking and I was able to get a pick under the upper right quarter and then use a pry pick to get it the rest of the way.
0 Experience here. Followed the instructions, checked some youtube tutorials too, and managed to replace the battery easily. The adhesive strips on the original battery were somewhat hard to remove but as clumsy as I am, managed to take out the battery without destroying other parts. 10/10.
Great guide, thanks a lot!