Remplacement de l'écran LCD de l'iPad 6 Wi-Fi
Introduction
Passez à l'étape 1Remplacez l'écran LCD défectueux ou endommagé d'un iPad 6.
Attention : la méthode d'isolation de la batterie décrite dans ce tutoriel est dépassée et peut entraîner des dommages irréversibles aux broches de la batterie de la carte mère, la détruisant ainsi de manière irréversible. Si vous choisissez d'isoler la batterie de cette manière, tenez compte de tous les avertissements et progressez avec une extrême prudence. Si vous choisissez de compléter le tutoriel sans isoler la batterie, évitez d'utiliser des outils métalliques sauf en cas de nécessité absolue (comme pour enlever des vis) pour éviter de court-circuiter la batterie et d'endommager les composants fragiles.
Ce dont vous avez besoin
Pièces
Outils
Afficher plus…
-
-
Faites chauffez un iOpener et posez-le sur le bord gauche de l'appareil pendant deux minutes.
-
-
-
Pendant que vous attendez que l'adhésif se ramollisse, notez les zones suivantes qui sont sensibles aux manipulations :
-
Caméra frontale
-
Antennes
-
Nappes d'écran
-
-
Outil utilisé dans cette étape :Clampy - Anti-Clamp$24.95
-
Tirez la poignée bleue vers l'arrière pour débloquer les bras de l'Anti-Clamp.
-
Posez votre iPad sur un objet, afin qu'il soit au même niveau que les ventouses.
-
Positionnez les ventouses au milieu du côté gauche de l'iPad – une dessus, une dessous.
-
Tenez fermement le bas de l'Anti-Clamp et appuyez sur la ventouse supérieure pour que les deux adhèrent.
-
-
-
Tirez la poignée bleue vers l'avant pour bloquer les bras.
-
Tournez la poignée dans le sens des aiguilles d'une montre, de 360 degrés ou jusqu'à ce que les ventouses commencent à s'étirer.
-
Vérifiez que les ventouses restent bien alignées entre elles. Si elles commencent à se décaler, détachez-les pour les réaligner.
-
-
-
Attendez une minute pour que l'adhésif ait le temps de se détendre et d'ouvrir un espace.
-
Si votre écran iPad n'est plus assez chaud, vous pouvez réchauffer le bord gauche avec un sèche-cheveux.
-
Insérez un médiator sous la vitre tactile lorsque l'Anti-Clamp a créé un espace suffisamment grand.
-
Sautez l'étape suivante.
-
-
-
Une fois que l'écran est chaud au toucher, posez une ventouse sur le bord gauche de l'écran et aussi près que possible du bord.
-
Soulevez l'écran à l'aide de la ventouse pour créer un petit espace entre la vitre tactile et le châssis.
-
Insérez un médiator dans l'espace entre la vitre tactile et le châssis.
I had a screen that was lightly cracked, and when I pulled up on the glass it cracked even further and made a mess of my removal. So, I would recommend taping cracks even if you can get suction so that you don’t induce even more cracks.
I actually had a really badly cracked digitizer. Using the suction cup did nothing but shatter the digitizer more. I intentionally drove a flat head screw driver into the digitizer to reveal the recess in the body where they are showing the opening-pick. Working around the edge, the glass shattered. You still need to be careful at all of spots noted in step 2.
Do not go under the digitizer more than the 1 mm along the sides or 3-4 mm at the corners as shown in step 29 using the flat grey ring around the edge for a reference. Direct all of your tool force into the body to prevent slipping into critical parts.
The antennas at either side of the home button were the trickiest part as they were thin and slightly attached to the digitizer. I would recommend using a plastic tool for these parts if you are having to 'scrape' the glass off of the tabs of the antenna.
-
-
-
Insérez un second médiator dans l'espace que vous venez de créer.
-
Faites glisser le médiator vers le coin inférieur gauche de l'appareil pour séparer l'adhésif.
-
Laissez le médiator dans le coin inférieur gauche pour éviter que l'adhésif n'adhère de nouveau.
-
-
-
Faites chauffer un iOpener et posez-le sur le bord supérieur de l'appareil pendant deux minutes.
-
-
-
Faites tourner le médiator autour du coin supérieur gauche de l'appareil pour séparer l'adhésif.
-
-
-
Faites glisser le médiator le long du bord supérieur de l'appareil, en vous arrêtant juste avant d'atteindre la caméra frontale.
-
-
-
-
Faites chauffer un iOpener et posez-le sur le bord droit de l'appareil pendant deux minutes.
-
-
-
Faites tourner le médiator autour du coin supérieur droit de l'appareil pour séparer l'adhésif.
-
-
-
Insérez un nouveau médiator et faites-le glisser jusqu'au milieu du bord droit de l'iPad.
There are sensitive display/digitizer cables no less than five inches from the bottom edge of the iPad. Insert the pick further down than this, or deeper than 1mm beyond this point and you risk irreparably damaging these cables.
Three inches is much too far down this side of the iPad to use picks.
-
-
-
Faites chauffer un iOpener et posez-le sur le bord inférieur de l'appareil pendant deux minutes.
-
-
-
Faites glisser le médiator inférieur gauche vers le coin inférieur gauche pour séparer l'adhésif.
-
Laissez le médiator dans le coin inférieur gauche avant de passer à l'étape suivante.
-
-
-
Insérez un nouveau médiator dans l'espace que vous venez de créer sur le bord inférieur de l'iPad.
-
Faites glisser le médiator sur l'antenne, en vous arrêtant juste avant le bouton home.
-
Laissez le médiator à gauche du bouton home avant de continuer.
-
-
-
Faites chauffer un iOpener et posez-le sur le bord droit de l'appareil pendant deux minutes.
-
-
-
Tout en soutenant la vitre tactile, glissez un médiator entre les deux nappes de l'écran pour séparer la dernière partie de l'adhésif.
-
-
-
Une fois que toute la colle a été séparée, ouvrez la vitre tactile comme un livre et posez-la à côté de l'iPad.
While reassembling, REALLY make sure the display cables and the home button cable won't be folded / bent while closing the digitizer. I'm not exactly sure what I did, but I broke the home button and touch ID since I bent the home button cable to the point that it broke. These ribbon cables are SUPER fragile.
-
-
-
Retirez les trois vis cruciformes #00 de 4,3 mm qui fixent l'écran LCD.
Both of the iPad 6th gen models i have seen so for (note they were cellular also) had the LCD secured with a grey silicone kind of adhesive in each corner under the screws. So you can’t just lift the LCD as you normally would after removing screws, it would break. I found you could pick at the corner closest to the rear camera easiest, slightly lift that corner and gently separate the other side next to the headphone jack. Then while supporting the LCD , lever the other end free with a up-and-down motion making slight progress each time.
On my iPad 6, there were small rubber tabs covering the two screws on the front camera side. I carefully held them out of place with tweezers while unscrewing the screws.
-
-
-
Utilisez la partie plate d'une spatule (spudger) pour soulever l'écran LCD hors de son emplacement juste assez pour que vous puissiez le saisir avec vos doigts. Il peut y avoir de la colle autour des trous de vis, qu'il faudra couper avec un couteau.
-
Retournez l'écran LCD comme la page d'un livre, en le soulevant au niveau de la caméra, puis en le faisant pivoter autour de l'axe du côté bouton home de la coque arrière.
-
Posez l'écran LCD sur sa face avant pour avoir accès à ses nappes.
When you replace the LCD be sure to make sure it is screwed in fully. It is easy not, especially on the cornet where the digitizer cables are. The LCD is very sensitive and if you bend it then it can stop working. I was just pressing the digitized in place at the end of a repair and the screen was covered in white lines.
I have no idea of what the logic board looks like !!!
-
-
-
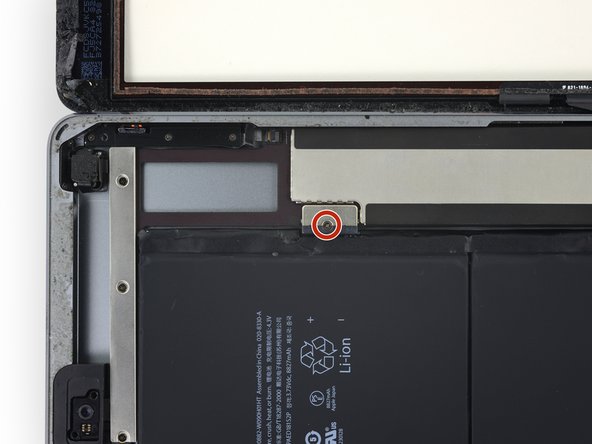
Retirez la vis cruciforme #000 de 2,3 mm qui fixe le connecteur de la batterie à la carte mère.
-
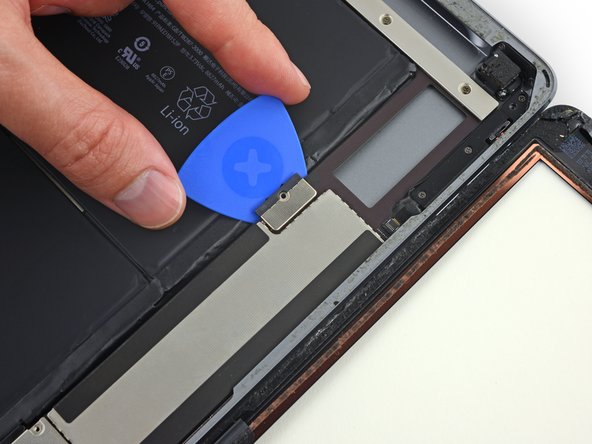
Faites glisser le médiator pour isoler la batterie sous le connecteur de la batterie de la carte mère, en l’inclinant à un angle de 35 degrés.
-
Laissez-le en place pendant que vous continuez votre réparation iPad.
If you insert a regular pick without a gap then you can damage this connector and will need a new motherboard. If in doubt just insert into the left corner enough to raise it a tiny bit. Arguably, if you are not sure, then it is safer just power off and don’t power back on until everything is fully connected. A photo of how this connector looks with its cover off would really help for people that have not seen this type of battery connector before. You just need to get it to lift a tiny bit, Do not try to slide anything under the contacts….
I bumped this darn thing several times, it was twisted and skewed making me freak out but the iPad still works. I am thinking you should pull it out and put the screw back in right after the LCD is removed. Then use it again just before putting the LCD screen back in. The pick is sticking out there waitng to be be bumped.
Hi Robin,
Unfortunately, there is no easy way to pull the battery connector out of the logic board. If you try to pry this connector off, you will irreparably damage it. The easiest solution is to insert the battery blocker in-between to cut the power.
The battery isolation pick or battery blocker is an outdated way of isolating the battery, as you risk damaging the battery pins underneath the logic board.
So what is the new method?
This is my question as well. Seems like this phrase contradicts the instructions. Confusing. Any reply?
We are currently working on a better isolation procedure! In the meantime, I’ve updated the warning to hopefully clarify the issue.
Why do you need to “To reduce the risk of a short”? There does not seem to by any risk of a “short” in this process. I can see other reasons for disconnecting the battery. I am an electrical engineer so I would appreciate a professional grade answer to this question.
I’ll give it a shot!
When you remove the screw, it doesn’t disconnect the battery, as the connector uses spring contacts to touch the battery pads.
If you leave the battery connected, it leaves the logic board energized. As there are many exposed traces and SMT components on the logic board, there is a chance that you accidentally bridge a trace with a metal tool, resulting damage. In addition, the display connector contains tiny pins, and the pinout is such that if you pry the connector from an energized logic board, there is a chance that a voltage rail pin may accidentally touch something it shouldn’t, blowing out the backlight circuitry.
My battery was dead when i did the repair. Did not really need to perform this step
Take a waterproof playing card, cut out the shape of the battery blocker and slide that under. Battery blocked and pins not at risk of damage. Got that from a YouTube video made by a microsolder repair tech fixing the damage caused by jamming a blocker in between the contacts.
Thanks for the tip Melody! I’ve updated the instructions to include the playing card method.
I could not for the life of me get the playing card in there, but my iPad was turned off, so I decided to ‘risk’ a short, instead of potentially damaging the battery connectors by jamming the card in there as hard as possible. My repair went fine, no short, however I realized AFTER closing everything up that I forgot to put the battery screw back in. Really hoping this doesn’t become an issue long term, because I don’t want to pry this brand new screen off just to put the battery in.
Let us know! I wasn't able to use the screw again after removing the battery blocker. Now my iPad turns off and on every so many minutes and when it restarts it's 1% and then shows actual charge.
When you come to screw this back together, do not overestimate how little force it takes to strip the thread on this #000 screw. I did, and I now I can't screw this back down and have the problem where the iPad restarts every 3 mins 20 sec after you turn it on due to a poor connection here. I've used card to pack this out so the LCD puts a little clamping force on the terminal once you screw it back in, but it's not really enough so the iPad still suddenly restarts occasionally.
I use a small screwdriver and pry underneath that brown bracket from the top edge by the camera (with the elongated metal cover removed of course) all the way before the battery, then lift up just enough for me to unhinged the battery out of the secure post. I don't know why Apple has to go through ALL THIS just to connect the battery since there is a small screw AND ADHESIVE securing it anyway. Nonetheless the whole job (replacing the lcd screen and battery was a major pain in the neck!
-
-
-
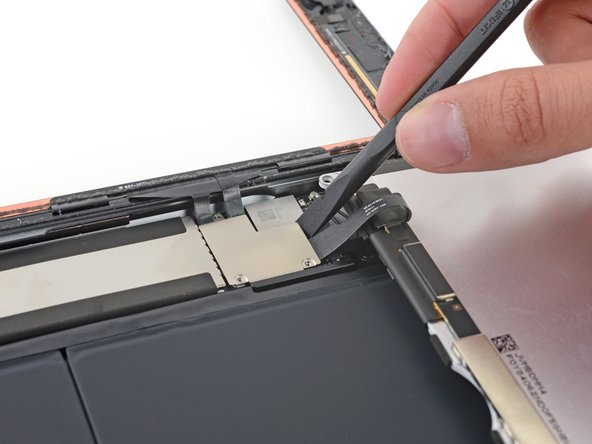
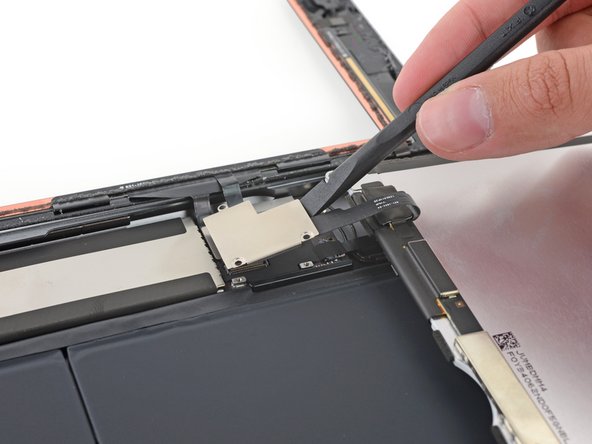
Retirez les trois vis cruciformes #000 de 1,4 mm du cache de la nappe de l'écran.
I believe these are also Phillips #00, not Phillips #000.
I lost a 1.4mm screw where can I buy these small screws and how big are they? 1.4mm x? flared or flat head
-
Pour remonter votre appareil, suivez les étapes dans l'ordre inverse.
Pour remonter votre appareil, suivez les étapes dans l'ordre inverse.
Annulation : je n'ai pas terminé ce tutoriel.
27 autres ont terminé cette réparation.
Merci à ces traducteurs :
100%
Ces traducteurs nous aident réparer le monde ! Vous voulez contribuer ?
Commencez à traduire ›
12 commentaires
No comments…. No one is brave enough to attempt this :)
I tried to replace the LCD with the iPad AIR 1 LCD and is NOT compatible. It fits and the connector is the same but shows just like tv static noise.
I have same issue, but with LCD iPad 5, some idea to make it compatible.
I replaced the front screen and now the number 9 on the passcode keypad isn’t working. I don’t get it.
I’m having the same issue! Different numbers, but same issue. Just certain sections of the screen won’t respond to touch.
I did this (screen replacement) on my iPad 6 LTE about a month ago. Was wicked difficult because my the screen was completely shattered and removing all of the shards was, well, a major PITA. It wasn’t all that bad otherwise as long as you TAKE YOUR TIME getting it apart in the first place. The only real issue I had otherwise was getting it back together with new adhesive strips because the screen doesn’t set on top straight down. You have to almost put one side down with the screen at an angle then lay it down but because of the adhesive strips, you can’t lay it down then adjust it. So that was not fun. Otherwise it wasn’t all that bad IF you are like me and savvy with electronics repair. *** also, once back together and fired up, I have some dead spots where there is zero registration of any touch on the screen. No clue as to why, and it’s frustrating because of the cost of these things and the replacement parts. Better than no usable screen I guess.
Please excuse any typos should you encounter any.
Hi Bryan,
If you haven’t yet, I would suggest checking two things. It sounds like either the digitizer cable may be having bad connectivity, or the digitizer may be shorting on something. Check, clean, and re-seat all of your display cable connectors as well as making sure the connectors have no debris. What is this (possibly conductive) gray foam adhesive called and where. Maybe that will remove the dead spots.
This was extremely difficult! But it was a little easier for me as I am an IT professional. Some helpful pro tips: definitely spend time just heating the adhesives over a period of a couple of days. The hardest part of the repair was separating the broken screen from the rest of the ipad. On re-assembly, check to make sure that the home button and touch are functioning properly before putting on new adhesives. This way you can correct any mistakes. Otherwise, you will have to undo the work you just did. Take your time, don’t rush so that you don’t make mistakes or break anything. The guide is very helpful and I was able to repair my ipad 6th generation.
Kevin
Ugh. This has been a PITA. I damaged the connector for lcd screen. bought replacement screen and now won’t work. HELP! Do I need to remove the old heat shield and attach it to the new lcd? What was I thinking?
Ive used 3 brand new LCDs and can’t get any of them to show a picture, when i plug in the old broken one it lights up just fine but is shattered beyond use. im starting to wonder if you can’t just replace the LCD without some sort of trick that only apple knows about
at least you have some dead spots. I just replaced LCD and digitizer. LCD was fine except I threw the LCD cable bracket away because I thought it came with the new one as it was attached to the old one. Needless to say I have no LCD cable bracket. The digitizer does not respond at all though and LCD screen works.
Managed to repair a few of these over the years... my 3 kids al had 6th gen's and 2 had cracked glass (digitizers) that I've done... today I did an LCD swap for an older one at work that had backlight strobing. No issues with the repair. Heat gun for adhesive along with the Anti-Clamp (great tool btw) and a iSesame opener tool... didn't bother with the battery disconnect. Just removed the LCD bracket/cable and installed "new" LCD I purchased from iFixit... though it was clearly used... it did have a plastic film on the screen but was VERY dirty on back and had old adhesive on it. But it worked fine. I did pick up a new digitizer in case I broke the glass removing the old one, but didn't need it. I had some extra adhesive laying around that I used to replace some of the marred adhesive from opening this one up. All-in-all, pretty straightforward ipad repair. And yes, had the glass been shattered, it is a MUCH longer and annoying repair. Been there before. Take your time cleaning it all up first.


