
Remplacement de la batterie du OnePlus 3

Introduction
Passez à l'étape 1Suivez ce tutoriel pour enlever la batterie du OnePlus 3. La partie la plus compliquée est de libérer les clips du châssis.
Si votre batterie est gonflée, prenez les précautions nécessaires.
Pour votre sécurité, déchargez votre batterie en dessous de 25% avant de démonter le téléphone. Cela réduit tout risque thermique si la batterie est accidentellement endommagée pendant la réparation.
Remarque : assurez-vous que le modèle de la batterie est le bon avant de commencer cette réparation. Les batteries des OnePlus 3 (BLP613) et des OnePlus 3T (BLP633) ne sont pas interchangeables.
Ce dont vous avez besoin
Kit de réparation
Ce kit contient toutes les pièces et tous les outils nécessaires à la réalisation de ce tutoriel.

Pièces

Outils


Afficher plus…
-
-
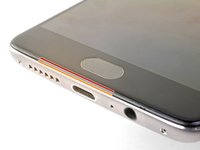
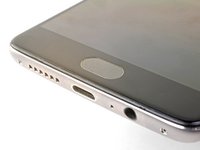
Insérer l'outil éjecteur de carte SIM ou un trombone déplié dans le trou situé entre l'emplacement de la carte SIM et le bouton de marche.
-
Appuyez fermement pour éjecter le tiroir de la carte SIM.
-
-
-
Sur la tranche inférieure du téléphone, enlevez les 2 vis de 2,6 mm avec un tournevis T2.
-
-
-
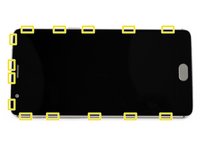
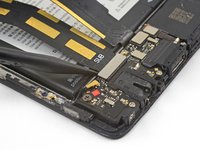
Jointure du panneau de l'écran : celle-ci fait partie de l'écran. Ne faites pas levier ici ou vous allez dissocier et endommager l'écran.
-
Jointure du châssis : c'est là où le châssis en plastique touche la coque arrière. C'est encastré dans le couvercle arrière. Faites levier uniquement ici.
-
Il y a 14 clips qui fixent le châssis à la coque arrière. Soyez conscient de leur position pendant que vous faites levier pour enlever la coque arrière au cours des étapes suivantes.
This picture is a bit misleading, the frame seam is actually sunk into the metal frame, and is not visible at first.
With an older phone, it’s more likely to separate the display panel itself than to separate the displaypanel from the frame. If the top of the screen comes off first, before the part with the touch sensor, then you’re separating the wrong thing (ie displaypanel).
Mind that the displaypanel itself seems as if it has two seams (the panel itself and the board).
Thanks for the helpful tip! I re-worded the step slightly to hopefully clarify where the frame seam is.
-
-
-
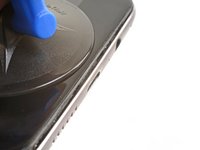
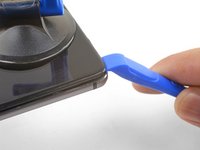
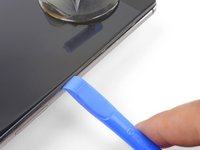
Placez une ventouse près de l’arête inférieure de l'écran.
-
Tirez fermement sur la ventouse avec une force constante.
-
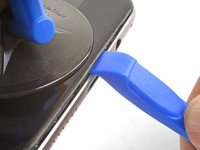
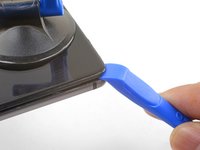
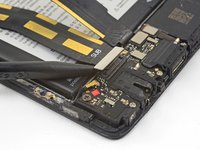
Insérez l'arête d'un outil d'ouverture dans la jointure du châssis, à côté de la ventouse, entre le châssis en plastique et le bord de la coque arrière.
To get maximum leverage and make this step possible with my weaker suction cup, I held down the phone with a plastic pick/tool pressed down onto the metal back. As the suction cup pulled up the plastic frame, the plastic pick holding down the metal back naturally was pushed further and further into the gap between the frame and back.
-
-
-
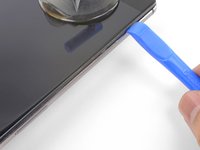
Continuez à faire glisser l'outil le long du bord long, en détachant les clips au passage.
I couldn’t get the last clip easily, so I also went around the other side, and then the last two clips left and right went out togther much more easily.
Yep, thanks for your note. It was far more easy to go round the other side.
-
-
-
-
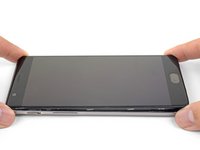
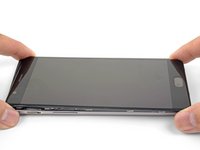
Une fois que les bords inférieur et gauche du téléphone sont détachés, remuez légèrement le châssis pour ouvrir les clips supérieurs et droits.
-
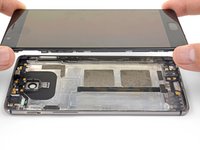
Soulevez l'écran et enlevez-le.
-
Alignez l’arête supérieure du châssis avec la coque arrière et assurez-vous que les clips supérieurs sont en place.
-
Appuyez sur les bords longs du téléphone pour fixer les clips restants.
I’m having trouble putting on the back cover, anyone else had this issue?
Hello.
From this Step on I directly jumped to Step 13. Removing the 7 Screws. NOT removing the Mainboard. It is easy possible to remove the camera just like this if you loosen the Camera-cable and pull carefull on it. Because the 7 Screws are removed there is enough space to remove the old camera and bring the new camera in. I tried It various times to verify this.
-
-
-
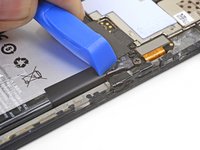
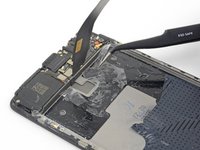
Utilisez la pointe d'une spatule pour faire levier et déconnecter le connecteur de la batterie, situé au-dessus du coin supérieur droit de la batterie
-
Écartez le connecteur de la prise pour éviter un contact accidentel.
Why not removing the camera without removing the mainboard?
Warum wird die rückseitige Kamera nicht ausgebaut, ohne das Mainboard auszubauen?
Hello Ingo,
The rear camera is trapped under the motherboard. You must at least loosen the motherboard to remove the camera.
Die Kamera befindet sich unter dem Motherboard. Sie müssen mindestens das Motherboard lösen, um die Kamera zu entfernen.
During reassembly this part was tricky for me: the new battery couldn’t clip into place the way the old one did, resulting in a loose connection and “battery does not match “ message when trying to power the phone up. The new battery probably had a slightly different connector that than the old one. I even ordered another battery but the same thing happened. I finally managed to connect it by applying much more pressure on the press connector than needed for the other ones. it did not make any clip sound though.
-
-
-
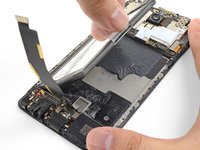
Enlevez la vis cruciforme de 3 mm qui fixe le cache de la nappe.
-
Ôtez le cache de la nappe.
-
-
-
Utilisez la pointe d'une spatule (spudger) pour faire levier et déconnecter la nappe de la carte fille, qui est située sous la batterie.
-
-
-
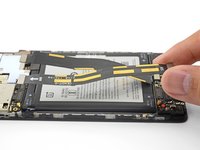
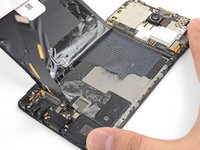
Enlevez la nappe d'interconnexion.
-
Repliez la nappe de la carte fille qui est encore attachée et gardez-la à distance de la batterie.
Upon reassembly place the cable back correctly. Apparently, it is often overlooked, see: Replaced Battery, Now My Phone is Overheating and Won't Boot
Thanks for the tip! I’ll adjust the step add this info.
-
-
-
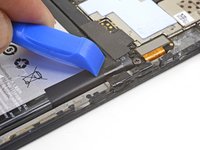
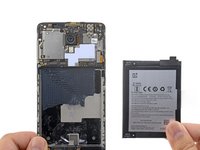
Appuyez le châssis du téléphone sur la table.
-
Tirez fermement, avec une force constante, sur la languette jusqu'à ce que la batterie commence à sortir de son compartiment.
-
Sortez complètement la batterie de son compartiment et nettoyez tout résidu d'adhésif.
I found (once I had bent the old battery removing it) that there is a film around the battery which would come away much more easily. I suggest this step is updated:
Peel back the four black sticky tabs which say “Position 1” (one at each corner of the battery) and the peel back the black sticky film connected to the tabs. Now pull the clear pull tab upwards and the battery should come away.
This! I did it by unpealing the “Position 1” tabs, and then pulled the battery much more easily. Thanks for the hint! Interestingly, it still came out with the black film intact and on the battery. I then put this black film and the pull tab on the new battery, which didn’t have either. I applied some double-sided tape between the black film and the phone to glue the whole thing in place.
I agreee , just peel the “position1” tabs. Plus my spare battery didn’t come with these tabs so I had to reuse the old ones anyway.
romDL -
-


Pour remonter l'appareil, suivez les instructions en ordre inverse.
Pour des performances optimales, calibrez la batterie après l'installation. Chargez-la à 100% et maintenez la charge pour au moins 2h. Puis utilisez l'appareil jusqu'à ce qu'il s'éteigne faute de batterie. Finalement, chargez-le sans interruption jusqu'à 100%
Débarrassez-vous de vos e-déchets de façon responsable.
La réparation ne s'est pas passée comme prévue ? Posez des questions à notre communauté pour obtenir de l'aide.
Annulation : je n'ai pas terminé ce tutoriel.
56 autres ont terminé cette réparation.
Merci à ces traducteurs :
100%


Ces traducteurs nous aident réparer le monde ! Vous voulez contribuer ?
Commencez à traduire ›


13 commentaires de tutoriel
Is this tutorial and the repair kit also applicable for the OnePlus 3T model? Thanks in advance for helping!
The tutorial for the 3T model would be similar, but not completely identical to this guide. Since the battery capacity is different between the 3 and 3T, the repair kit would not be applicable. However, the tools are most likely the same.
Thanks for your response Arthur! Is it planned to offer a battery kit also for the OnePlus 3T? I’d definitely appreciate it since I can’t find any trustworthy OnePlus 3T batteries so far. Best regards!
Unfortunately, I don’t think we are releasing a 3T battery kit anytime soon.
My One Plus 3 is A3003, is the BLP613 battery compatible with this device ? on some website they write that A3003 is One Plus 3T and not One plus 3 …
Hi Alexandre,
OnePlus seemingly used the A3003 model for both the OnePlus 3 and 3T model. You can try opening the “About Phone” page in the settings menu to see what the phone lists itself as.
The OnePlus 3T has a bigger battery (3400 mAh vs. 3000 mAh), so there is a strong chance that the two are incompatible.
Great guide, replacement went smoothly
Replaced my battery recently. It went well. Thanks for the guide!
The need for my own adhesive isn't mentioned anywhere except at the very bottom. I ended up not using any because I don't have any. It'd be nice if it were listed as a "tool" or "part" at the top.
I followed the steps to calibrate the battery, but for several days now, my phone's shutting down due to low battery (like extreeemely low, not the usual "hmmm I'm low on battery I'm gonna turn myself off" but rather instant death). Any tips? I do have LineageOS instead of Hydrogen or Oxygen.
I'm in the same situation. Is the phone ok without the adhesive on the battery?
Vorador -
I've just realized that. I have a 3T and bought from ifixit a battery replacement for a One plus 3. because it was "Global (A3003)" compatible. Which my 3T indicates on the back frame... It is misleading, don't buy this battery.