Il est possible que cette traduction ne reflète pas les dernières mises à jour du tutoriel source. Aidez à mettre à jour la traduction ou bien consultez le tutoriel source.

Remplacement des bandes adhésives d'un iMac Intel 27" EMC 2546
Introduction
Passez à l'étape 1Enlevant l´écran d´un iMac fin 2012 nécessite de découper l'adhésif tout autour de l'écran. L'adhésif coupé ne peut pas être utilisé pour refixer l'écran, vous aurez donc besoin d'un nouveau jeu de bandes adhésives.
Ce dont vous avez besoin


Vidéo d'introduction
Légende de la vidéo
-
-
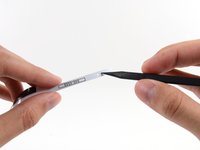
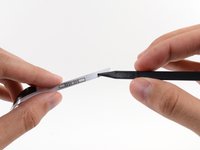
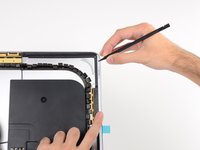
Avant de commencer à placer des bandes, enlevez tout le vieil adhésif. Utilisez un spudger pour écorcher un bord, puis pelez avec vos doigts.
-
-
-
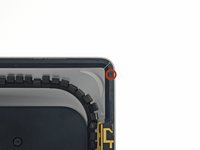
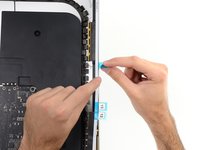
Tout en maintenant le spudger percé dans le trou de la bande adhésive, poussez la pointe du spudger dans le trou correspondant sur l´encadrement de l'iMac.
-
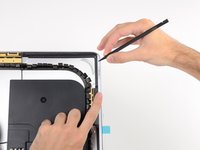
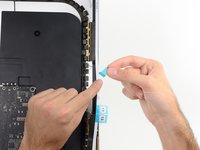
En utilisant le trou et le spudger pour ancrer la position de la bande adhésive, alignez la bande contre le bord droit, tirez doucement vers le bas contre le spudger afin de vous assurer que la bande est tendue, et collez-la sur l´encadrement.
-
-
-
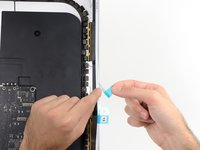
Travaillez tout autour de l'iMac, en ajoutant trois autres bandes adhésives de la même manière.
-
Travaillez dans le sens antihonaire à partir de la bande 13, placez la bande 12 en haut à droite, la bande 11 en haut à gauche, et la bande 16 sur le côté gauche.
-
Sur l'iMac Intel 27 " écran réticulaire 5K, les partis bleus de la bande 12 ne s´aligneront pas aussi bien avec l'antenne du haut qu´un modèle normal. Ceci est parfaitement acceptable et n´affectera pas les performances ni des bandes ni de l'antenne.
-
-
-
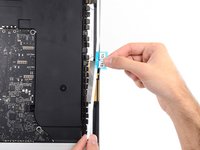
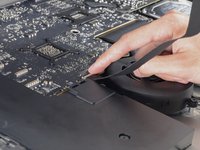
Insérez délicatement le connecteur de l'écran dans son logement sur la carte logique. Assurez-vous de l'emmener droit dans la prise, et insérez-le complètement.
-
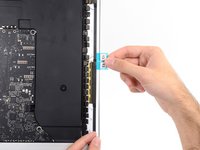
Retournez le connecteur de l´écran et verrouillez vers le bas sur son support. .
-
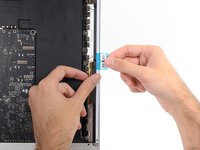
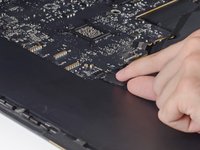
Insérez le connecteur d'alimentation de l'écran dans son logement sur la carte logique.
-


Pour remonter votre appareil, suivez ces instructions dans l'ordre inverse.
Pour remonter votre appareil, suivez ces instructions dans l'ordre inverse.
Annulation : je n'ai pas terminé ce tutoriel.
188 autres ont terminé cette réparation.
Merci à ces traducteurs :
55%


Ces traducteurs nous aident réparer le monde ! Vous voulez contribuer ?
Commencez à traduire ›

17 commentaires
Hello guys!
Could anyone tell what the width of these strips is? I need to buy some double sided strips to do a hard drive upgrade, but I can't order from iFixit :(
Thank you!
Some 3m Extreme Mounting tape works perfect for hdd upgrades on an imac.
torch130 -
Hey guys... there's one critical step that's missing here. Before doing Step 18, you have to make sure the iSight camera is in the right place. It's 'floating' inside the computer housing and has to be positioned just right for the glass to close/seal properly with the frame. I followed all of these steps but the glass would not seal around the camera, leaving a 1/8" gap there and distortion on the LCD when powered on. I had to re-order the strips and do the process over again. While doing a 'dry run', I realized the camera was the culprit and was able to hold it in position with a paper clip which allowed for the glass to adhere properly on the 2nd try.
I'm surprised to see, that you install the tape strips on the unit lying down.
It's a lot easier to attach them with the unit standing upright.
Also, attach ALL the strips to the rear housing, NOT to the LCD.
Attach the tape strips to the housing, mount the display, use som painters (/masking) tape, when you have aligned the display to the edges of the housing, attach the tape to the bottom of the glass and rear housing, making sure the display won't slip out of alignment.
Then, tilt the display towards you and support it with either a hand or your chest, while you remove the tapes protective layer and tilt the display back.
That way, it's still well aligned and it won't shift.
Same goes when removing the display in the first place.
Don't lay it down on the table - use a wedge, to make sure that the housing doesn't tilt while removing the display, and let the wedge stay there unit finished. The display is a lot easier to handle when upright, and you won't put too much pressure on the edges of the glass.
By the way, a minor detail you guys left out;
The tape strips for the 2012 and 2013, are not the same as 2014 Retina model.
The WiFi antenna's are located differently on the right. It's slightly elevated on the Retina, compared to the 2012 and 2013 models.