
Remplacement de la batterie du Samsung Galaxy S20

Introduction
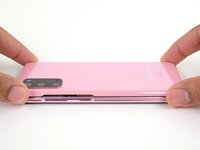
Passez à l'étape 1Ce tutoriel vous montre comment retirer et remplacer la batterie de votre Samsung Galaxy S20.
Elle est collée avec de l'adhésif tenace. Vous devrez utiliser de l'alcool isopropylique à haute concentration (plus de 90 %) pour ramollir et décoller l'adhésif.
Si votre batterie est gonflée, prenez les précautions nécessaires et ne chauffez pas votre téléphone.
Pour votre sécurité, laissez la batterie se vider en dessous de 25 % avant de vous lancer. Cela réduit les risques de déclencher un incendie dangereux si jamais vous abîmez accidentellement la batterie pendant la réparation.
Lors du remontage, vous aurez besoin d’adhésif de remplacement pour rattacher certains composants.
Ce dont vous avez besoin
Kit de réparation
Ce kit contient toutes les pièces et tous les outils nécessaires à la réalisation de ce tutoriel.

Pièces


Outils


Afficher plus…
-
-
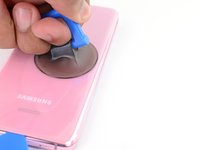
Faites chauffer un iOpener et posez-le sur le bord inférieur de la coque arrière pendant deux minutes.
-
-
-
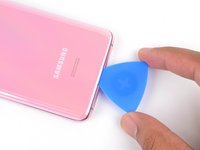
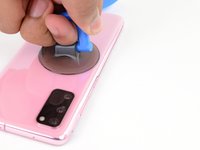
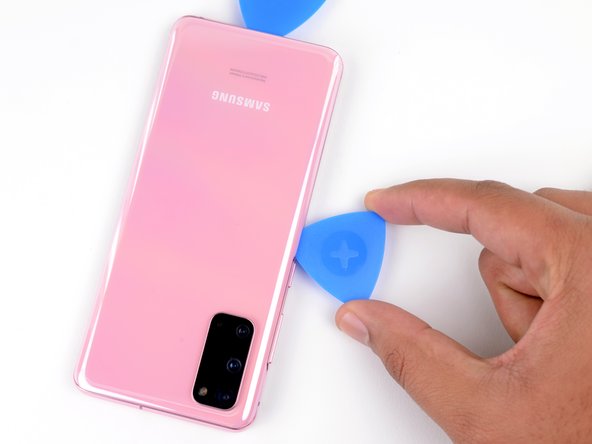
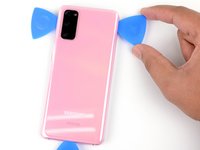
Posez une ventouse sur la coque arrière du téléphone, aussi près que possible du milieu du bord inférieur.
-
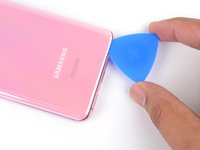
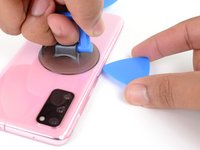
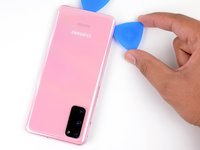
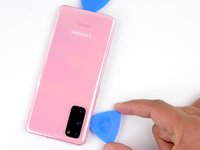
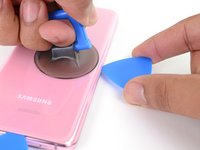
Tirez fortement et constamment sur la ventouse pour ouvrir un espace entre la coque arrière et le châssis.
-
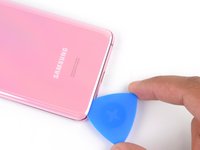
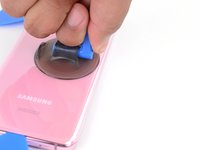
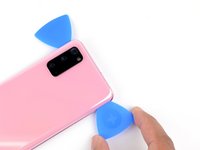
Insérez la pointe d'un médiator dans l'espace.
While pulling on the back glass with the suction cup, I found it helpful to use something like the opener tool to press down on the frame. Made it easy to pull open even with the iOpener.
-
-
-
Posez un iOpener chauffé sur le bord gauche de la coque arrière pendant deux minutes.
-
-
-
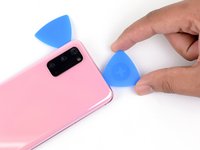
Posez une ventouse sur la coque arrière, aussi près que possible du milieu du bord gauche.
-
Tirez fortement et constamment sur la ventouse pour ouvrir un espace entre la coque arrière et le châssis.
-
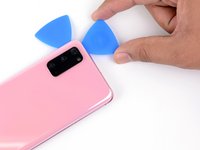
Insérez la pointe d'un médiator dans l'espace.
-
Vous pouvez également déposer quelques gouttes d'alcool isopropylique à haute concentration (plus de 90 %) dans la jointure pour contribuer à faire céder l'adhésif.
-
-
-
Posez un iOpener chauffé sur le bord droit de la coque arrière pendant deux minutes.
-
-
-
Posez une ventouse sur la coque arrière, aussi près que possible du milieu du bord droit que possible.
-
Tirez fortement et constamment sur la ventouse pour ouvrir un espace entre la coque arrière et le châssis.
-
Insérez la pointe d'un médiator dans l'espace.
-
-
-
Posez un iOpener chauffé sur le bord supérieur de la coque arrière pendant deux minutes.
-
-
-
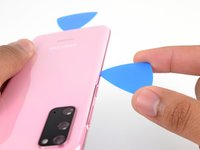
Faites progressivement glisser votre médiator depuis le bord droit de l'appareil jusqu'au coin supérieur droit.
-
Continuez à trancher tout le long du bord supérieur pour décoller complètement l'adhésif de la coque arrière.
-
-
Outil utilisé dans cette étape :Tweezers$4.99
-
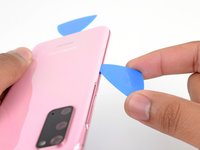
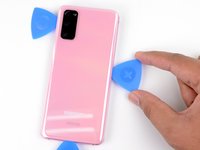
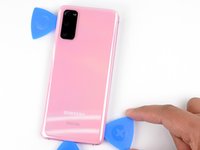
Soulevez lentement la coque arrière. Servez-vous des médiators pour finir de trancher l'adhésif.
-
Retirez la coque arrière.
-
Voici venu le bon moment pour rallumer votre téléphone et tester s'il fonctionne avant de le refermer. N'oubliez pas de le réteindre complètement avant de reprendre le remontage.
-
Retirez les éventuels restes ou morceaux d'adhésif avec vos doigts ou une pincette. Appliquez de la chaleur s'il est trop difficile de décoller l'adhésif.
-
Si vous utilisez des adhésifs pré-découpés, suivez ce tutoriel.
-
Si vous utilisez un adhésif double-face, suivez ce tutoriel.
-
-
Outil utilisé dans cette étape :Magnetic Project Mat$19.95
-
Avec un tournevis cruciforme #00, dévissez les cinq vis de 4 mm de long qui fixent le cache de la carte mère.
-
-
Outil utilisé dans cette étape :Tweezers$4.99
-
Tirez sur le cache de la carte mère avec une pincette pour le détacher du châssis central en plastique.
-
-
-
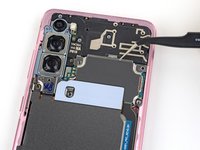
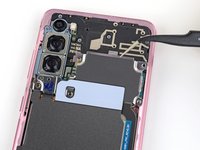
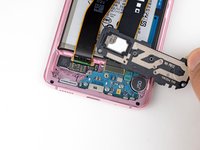
Décollez délicatement la bobine de charge de l'appareil.
-
Retirez-la.
-
-
-
Faites levier avec une spatule (spudger) pour débrancher le connecteur de la batterie.
-
-
-
Avec un tournevis cruciforme #00, retirez les cinq vis de 4 mm de long qui fixent le haut-parleur et le châssis central inférieur.
-
-
Outil utilisé dans cette étape :Tweezers$4.99
-
Insérez la pointe d'une spatule ou une pincette dans l'encoche du coin supérieur gauche du châssis central et faites levier pour détacher les clips qui le maintiennent en place.
-
Retirez le haut-parleur et le châssis central inférieur.
-
-
-
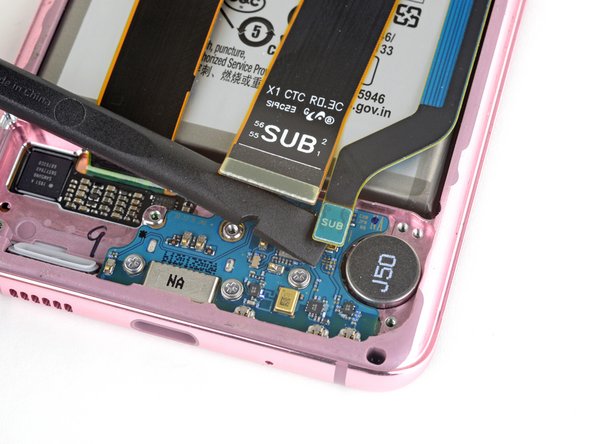
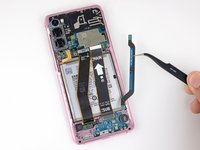
Faites levier avec une spatule pour déconnecter les nappes principale et secondaire de la carte fille en bas de l'appareil.
-
-
-
Soulevez et déconnectez les nappes principale et secondaire de leur prise sur la carte mère.
-
-
-
Décollez et retirez délicatement les nappes principale et secondaire.
-
-
-
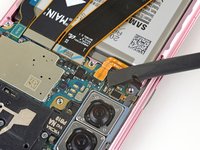
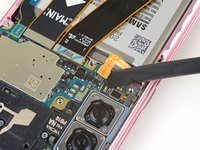
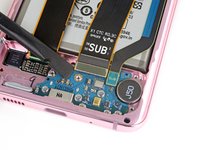
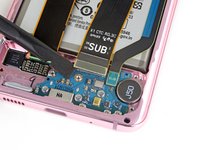
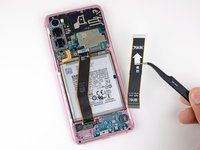
Faites levier sur la nappe principale d'écran avec une spatule pour la débrancher de la carte mère.
-
-
-
Décollez et repliez délicatement la nappe d'écran de côté pour dégager la carte mère et la batterie.
-
-
-
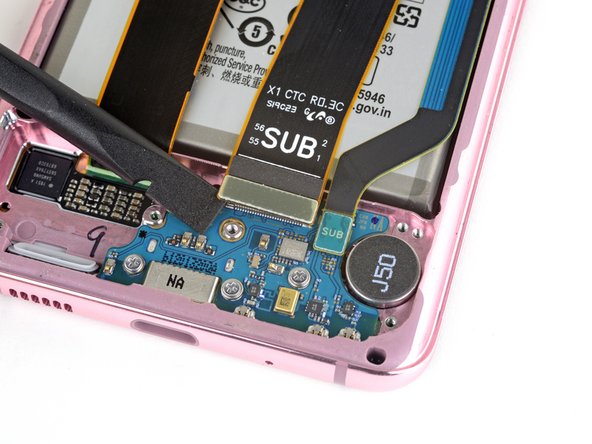
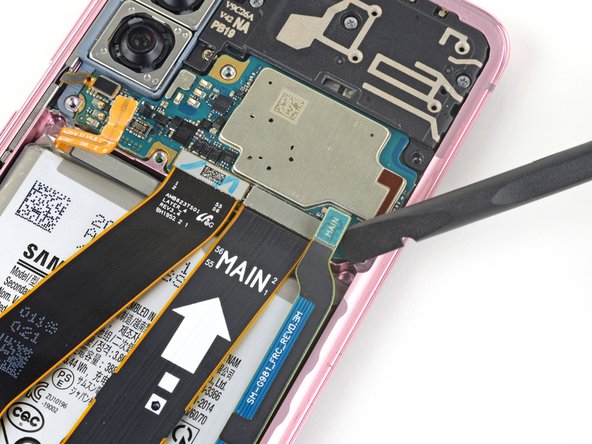
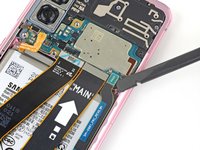
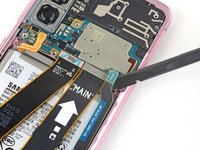
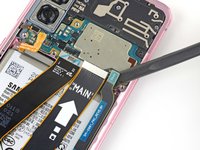
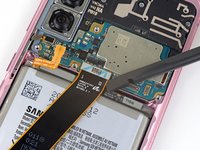
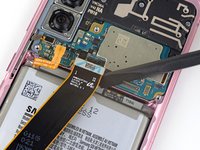
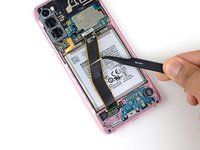
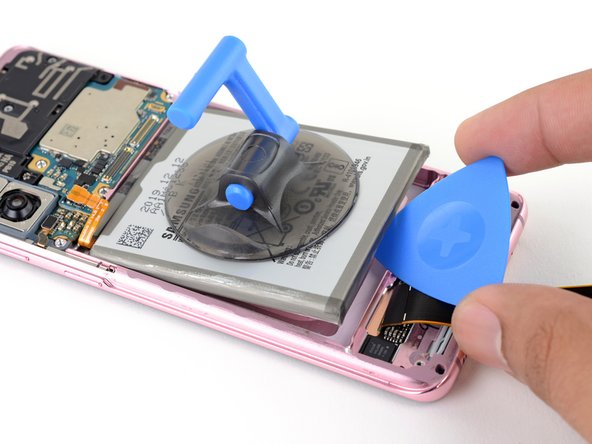
Appliquez 1 - 2 gouttes d'alcool isopropylique à haute concentration (plus de 90 %) sur le bord supérieur de la batterie.
-
Attendez une minute pour permettre à l'alcool isopropylique de ramollir l'adhésif.
-
-
-
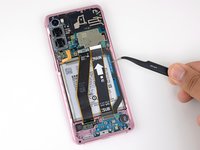
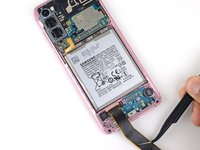
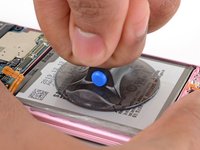
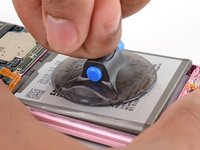
Posez une ventouse au milieu de la batterie.
-
Appuyez le haut et le bas de l'appareil contre votre surface de travail d'une main et tirez fermement sur la ventouse de l'autre.
-
Retirer l'adhésif prend du temps et des tractions répétées plutôt qu'une force importante sont plus efficaces. Tirez sur la ventouse avec une force constante pendant 15 secondes régulièrement.
-
Si la batterie ne se desserre pas, appliquez 1 à 2 gouttes d'alcool isopropylique sur les bords supérieur, gauche et droit, attendez une minute et tirez à nouveau.
-
Quand la batterie commence à se soulever, passez à l'étape suivante.
-
-
-
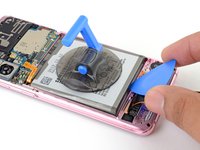
Insérez un médiator sous le bord inférieur de la batterie et faites-le pivoter pour décoller la batterie.
-
-
-
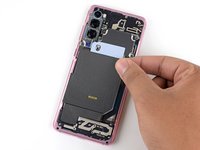
Ôtez la batterie.
-
Décollez et/ou grattez les résidus d'adhésif de la batterie avant de nettoyer la surface du compartiment de la batterie avec de l'alcool isopropylique et un chiffon non pelucheux.
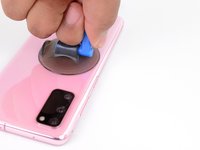
What is the piece behind the battery that looks like its circled called? Is it normal to see this piece when shining a flashlight onto the screen when the phone is off?
That’s the fingerprint sensor! Because it’s embedded in the screen, if you shine a light behind it, you can see it through the front glass.
-


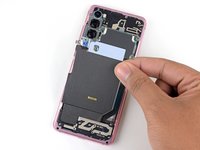
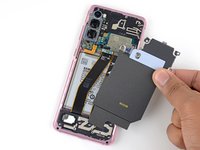


Comparez votre pièce de remplacement à la pièce d'origine. Il vous faudra peut-être transférer d'éventuels composants restants ou retirer des films adhésifs de la nouvelle pièce avant de commencer le remontage.
Pour remonter votre appareil, suivez les étapes ci-dessus en sens inverse.
Suivez ce tutoriel (en anglais) pour réinitialiser le cycle de la batterie et calibrez votre nouvelle batterie.
Déposez vos déchets électroniques dans un centre de recyclage certifié.
La réparation ne s’est pas déroulée comme prévu ? Consultez notre Forum ou le wiki de diagnostic pour la batterie du S20 (en anglais) pour obtenir de l’aide au diagnostic.
Annulation : je n'ai pas terminé ce tutoriel.
29 autres ont terminé cette réparation.
Merci à ces traducteurs :
100%


Ces traducteurs nous aident réparer le monde ! Vous voulez contribuer ?
Commencez à traduire ›

25 commentaires
I had a huge amount of difficulty removing the battery during this repair. The adhesive is really strong, the suction cup doesn't stick to the battery very well and if you lever it out you run the risk of puncturing the battery. It's also really difficult to pull up on the battery while holding the phone down, especially because you want to avoid touching the circuits.
Eventually I succeeded and everything seemed to work but the next day the phone wouldn't switch on. I think maybe the adhesive remover got somewhere it shouldn't have. If I could add something to this guide, it would be "once battery is removed, allow phone to sit for 30 mins to ensure all adhesive remover has evaporated". If I was allowed a do-over I would try to heat the adhesive instead. Or use the string trick. I'm switching to an iphone now because apparently they don't glue their batteries.
Good point! I would suggest to use pure isopropyl alcohol and not something below 99%. The residual water might be not much but still there is a slight chance of it getting somewhere inside. Also the 99% pure alcohol evaporates much faster and leaves no traces. Apple batteries are also glued in with adhesive. What apple does right are the pull-strings to remove the sticky tape between chassis and battery.
Followed every step and managed to complete it but after a couple of minutes the phone screen stopped working and turned black.
I'm pretty sure that happened because the isopropyl alcohol went through the phone into the screen through the gap right under where the battery seats.
If you attempt this at home be aware this might happen, so disconnect the display too or look into using a different method for removing the battery.
I don't think this repair is worth attempting. I also killed my screen with this one, similar to the two commenters above. Whether it was isopropyl alcohol getting into the LCD or whether it was some issue with flimsy connectors I don't know. I was super careful and I've still bricked it, so I'd rate this repair as 'too risky'.
i typically use an iPlastix opening tool, a heating pad and lots of alcohol, get the very tip of the opening tool to sort of bend or roll into a curve, then slip the bent tip into the gap between frame and battery dripping some alcohol onto the tool, eventually you can get the rolled end to slip underneath the battery. then just slide the tool around the perimeter of the battery, cutting the adhesive, eventually, once all the adhesive is cut the battery will easily pry out of the phone. continually apply alcohol to the surface of the tool once you get the curved end under the battery, the alcohol will drip down the tool and find its way under the battery more easily weaking the adhesive.
since the tool is made of plastic, its almost impossible to scratch, bend or puncture the battery during the removal process by using this method, this is also my preferred method for removing bulged batteries that a suction cup wont stick to, or batteries where putting any unnecessary pressure could cause them to burst.
As with other comments, battery swap went fine, but after a bit of use I connected the phone to a charger and screen went black. Strange experience, feels like it's booby trapped.
I used this repair guide to change my battery in my S20. All went well and successfully especially after using this guide. IPA helped massively to remove the battery but I DO NOT RECOMMEND USING IT. i read the comments about the screen going blank etc. i used a heat gun to evaporate the IPA before reassembling the device thinking this would eliminate any issues. I WAS WRONG. DO NOT USE IPA to remove the battery. I turned my phone back on ant it was okay for a few minutes. Then the screen started flickering and turned completely green then went black. The phone still works as i can hear the notification sounds etc but no screen. Again DO NOT USE IPA TO REMOVE BATTERY
When the alcohol gets into the screen, the screen becomes black, it dies. Do not try this guide.
Did this repair to a T, it killed my display about 30 mins later. DONT USE IPA
I even used my heat gun to evaporate all of it off, let the phone sit for an hour too. still killed it!
Hi Bradley,
I'm really sorry to hear of your repair experience. I think the IPA may have seeped through the fingerprint sensor cutout and into the OLED panel.
When the battery adhesive is still intact, it should seal against moderate use of IPA along the top and side edges. I looked over the guide and changed the wording to give clearer guidance and warnings on how much to apply, where to apply it, and when not to use IPA.
Is there any procedure needed to reset the battery stats or charging levels? I replaced without problem but my battery life is not as good as my old battery! Wondering if there is a step on the software side?
Did you figure it out? I have the same issue. Looks like an original battery, but batt life is weak and Samsung Members diagnostics shows battery needs replacement...
Slawek -
The screws are more likely to be #0 JIS rather than #00 Phillips. Certainly my JIS screwdriver fits much better than my Phillips one.
I haven't had a problem with IPA use yet, but the battery adhesive is stupidly strong. Just use a mechanical clip, Samsung. My Blackberry is: slide back off, lift up battery, insert new battery, slide on back cover. Probably five seconds. Things weren't so bad in the 2010s.
The Samsung battery reset app doesn't recognise the QR code on the packaging so far.
As well i killed my screen, i turned up and and worked a few minutes, later I left it charging, and when I came back the screen was completely black, I plug it to my monitor, and the phone is still working but no the screen. Anyway his method did not help me to remove the battery
After all these comments concerning a screen-blackout after using alcohol I didn't dare to use that. Just pulled with the suction handle and pried with different tools from the bottom. That took a lot of time, sweat, fear to break the battery and quite some force. Why do manufacturers glue in the batteries?!
Worked out fine and I'm happy with the new battery.
why does it needs to be below 25%? I understand it being at maximum 60%, but for what I learned Li-ion batteries are unstable at 0% too. Maybe it needs to be better specified?
Toller Guide!
War mein erster Akkutausch.
Statt dem Alkohol hab ich aber den Akku bzw Kleber mit einem Föhn über die Displayseite erwärmt. Hat wunderbar funktioniert.
Klebereste hab ich dann mit 2 Tropfen Desinfektionsgel und nem Wattestäbchen gelöst. Rückbau hat auch ohne Probleme funktioniert.
I completed the swap without affecting the screen. To avoid killing the screen as others have done, I used 2 tiny drops of acetone from a needle behind the battery then applied constant even pressure to the battery over a long period of time. If you do not have a way of getting the solvent accurately only onto the glue, use the constant pull method alone. Be careful about putting tools behind the battery as there is an area behind the battery with a soft membrane.
I completed the swap without obvious issue. However if I unplug the phone from a charger it immediately turns off as if there is no battery at all. I re-opened the phone and disconnected and reconnected all the upper and lower flex cable connectors carefully. This did not resolve the issue. The battery shows 4000 mAh at 100% or 99% charge when connected to USB and powered on. I don't know if there is something I am missing of if I possibly revived a bad replacement battery.
Thanks for this informative instruction manual. What I would like to ask is, where can I find a genuine S20 battery?
Found that using the iOpener did not provide enough heat to weaken the adhesive, went with a hairdryer instead. Make sure to never keep the hairdryer still, and apply heat on high for 30 seconds to 1 minute per side did the job for me. iOpener just did not get hot enough
Phil R - Réponse